
The Mother of the World’s Motherboard
An AI-Powered Advisor for social and economic development of the Mother of the World, Egypt.
by Kareem H. El-Sisi,
Massachusetts Institute of Technology
The Background

A majority of my projects have looked towards my Egyptian heritage as an inspiration for creating tools for the future. Egypt has many epithets, such as the “Cradle of Civilization,” the “Birthplace of Excellence,” the “Gift of the Nile,” and the “Gateway to Africa.” However, the most popular epithet that is locally and regionally used is the "Mother of the World," reflecting Egypt's unparalleled and central role in human history and civilization.
The grand finale had to be a dedication to Egypt's 6,000 years of creating excellence and pioneering innovation. I also wanted to make sure this had practical function that could be used in the real world, rather than just retiring in the university’s archives. It took a while for me to figure out what I wanted to make, but I had a guiding question:
How do we combine the past with the future, the ancient with the modern, philosophy with technology, and architectural aesthetic with mechanical function?
The Brainstorm


Demand vs. Desire
I have to incorporate 2D and 3D design, additive and subtractive fabrication processes, electronics design and production, embedded microcontroller design, interfacing, and programming, system integration and packaging.
I would like to make something that represents Egypt’s cultural diversity and technological distinction, relates to my backgrounds in city planning, computer science, and economics/finance, incorporates artificial intelligence, transforms fiction into reality, and can be presented as a gift to the our leader, President Abdelfattah El-Sisi. It should something that can be described in a sentence. Also, its important to me that this can be built by others easily if given the assembly instructions and code.
Approach
I wrote the demands and desires, then created a visualization of my flagship series of projects has been forming a fusion of ancient architectural mapping with modern technology via the striking similarities between ancient Egyptian structures and modern circuit boards. But, I’ve never done the map of Egypt itself, that would call for an unorthodox cut-out of a printed circuit board (PCB).
Potential Ideas
The result of the brainstorming and ideation phase was a list of ideas, all very different from each other but they had a core similarity: delivers the demand and desire. Then there was the review of the all previous projects and the blueprints of the idea for this project, the feedback was quite constructive. Diana Mykhaylychenko suggested that I make a cost-benefit analysis to weigh the options, while Anthony Pennes helped as source to understanding the feasibility and difficulty to pull off each idea. I also reached out to Niklas Hagemann since he was former lab mate at SCL upon the recommendation of Tobi Oyinlola. Niklas helped point out previous projects to gain inspiration from and ideas on how to make it more realistic. Tobi was significant driver in understanding what could be done in the given amount of time and the difficulty of each project idea, while providing alternative ideas on what could be done. Ultimately, none of my project ideas were given the green light, except one that would eventually lead to another project: The Map of Cairo as a Circuit Board.

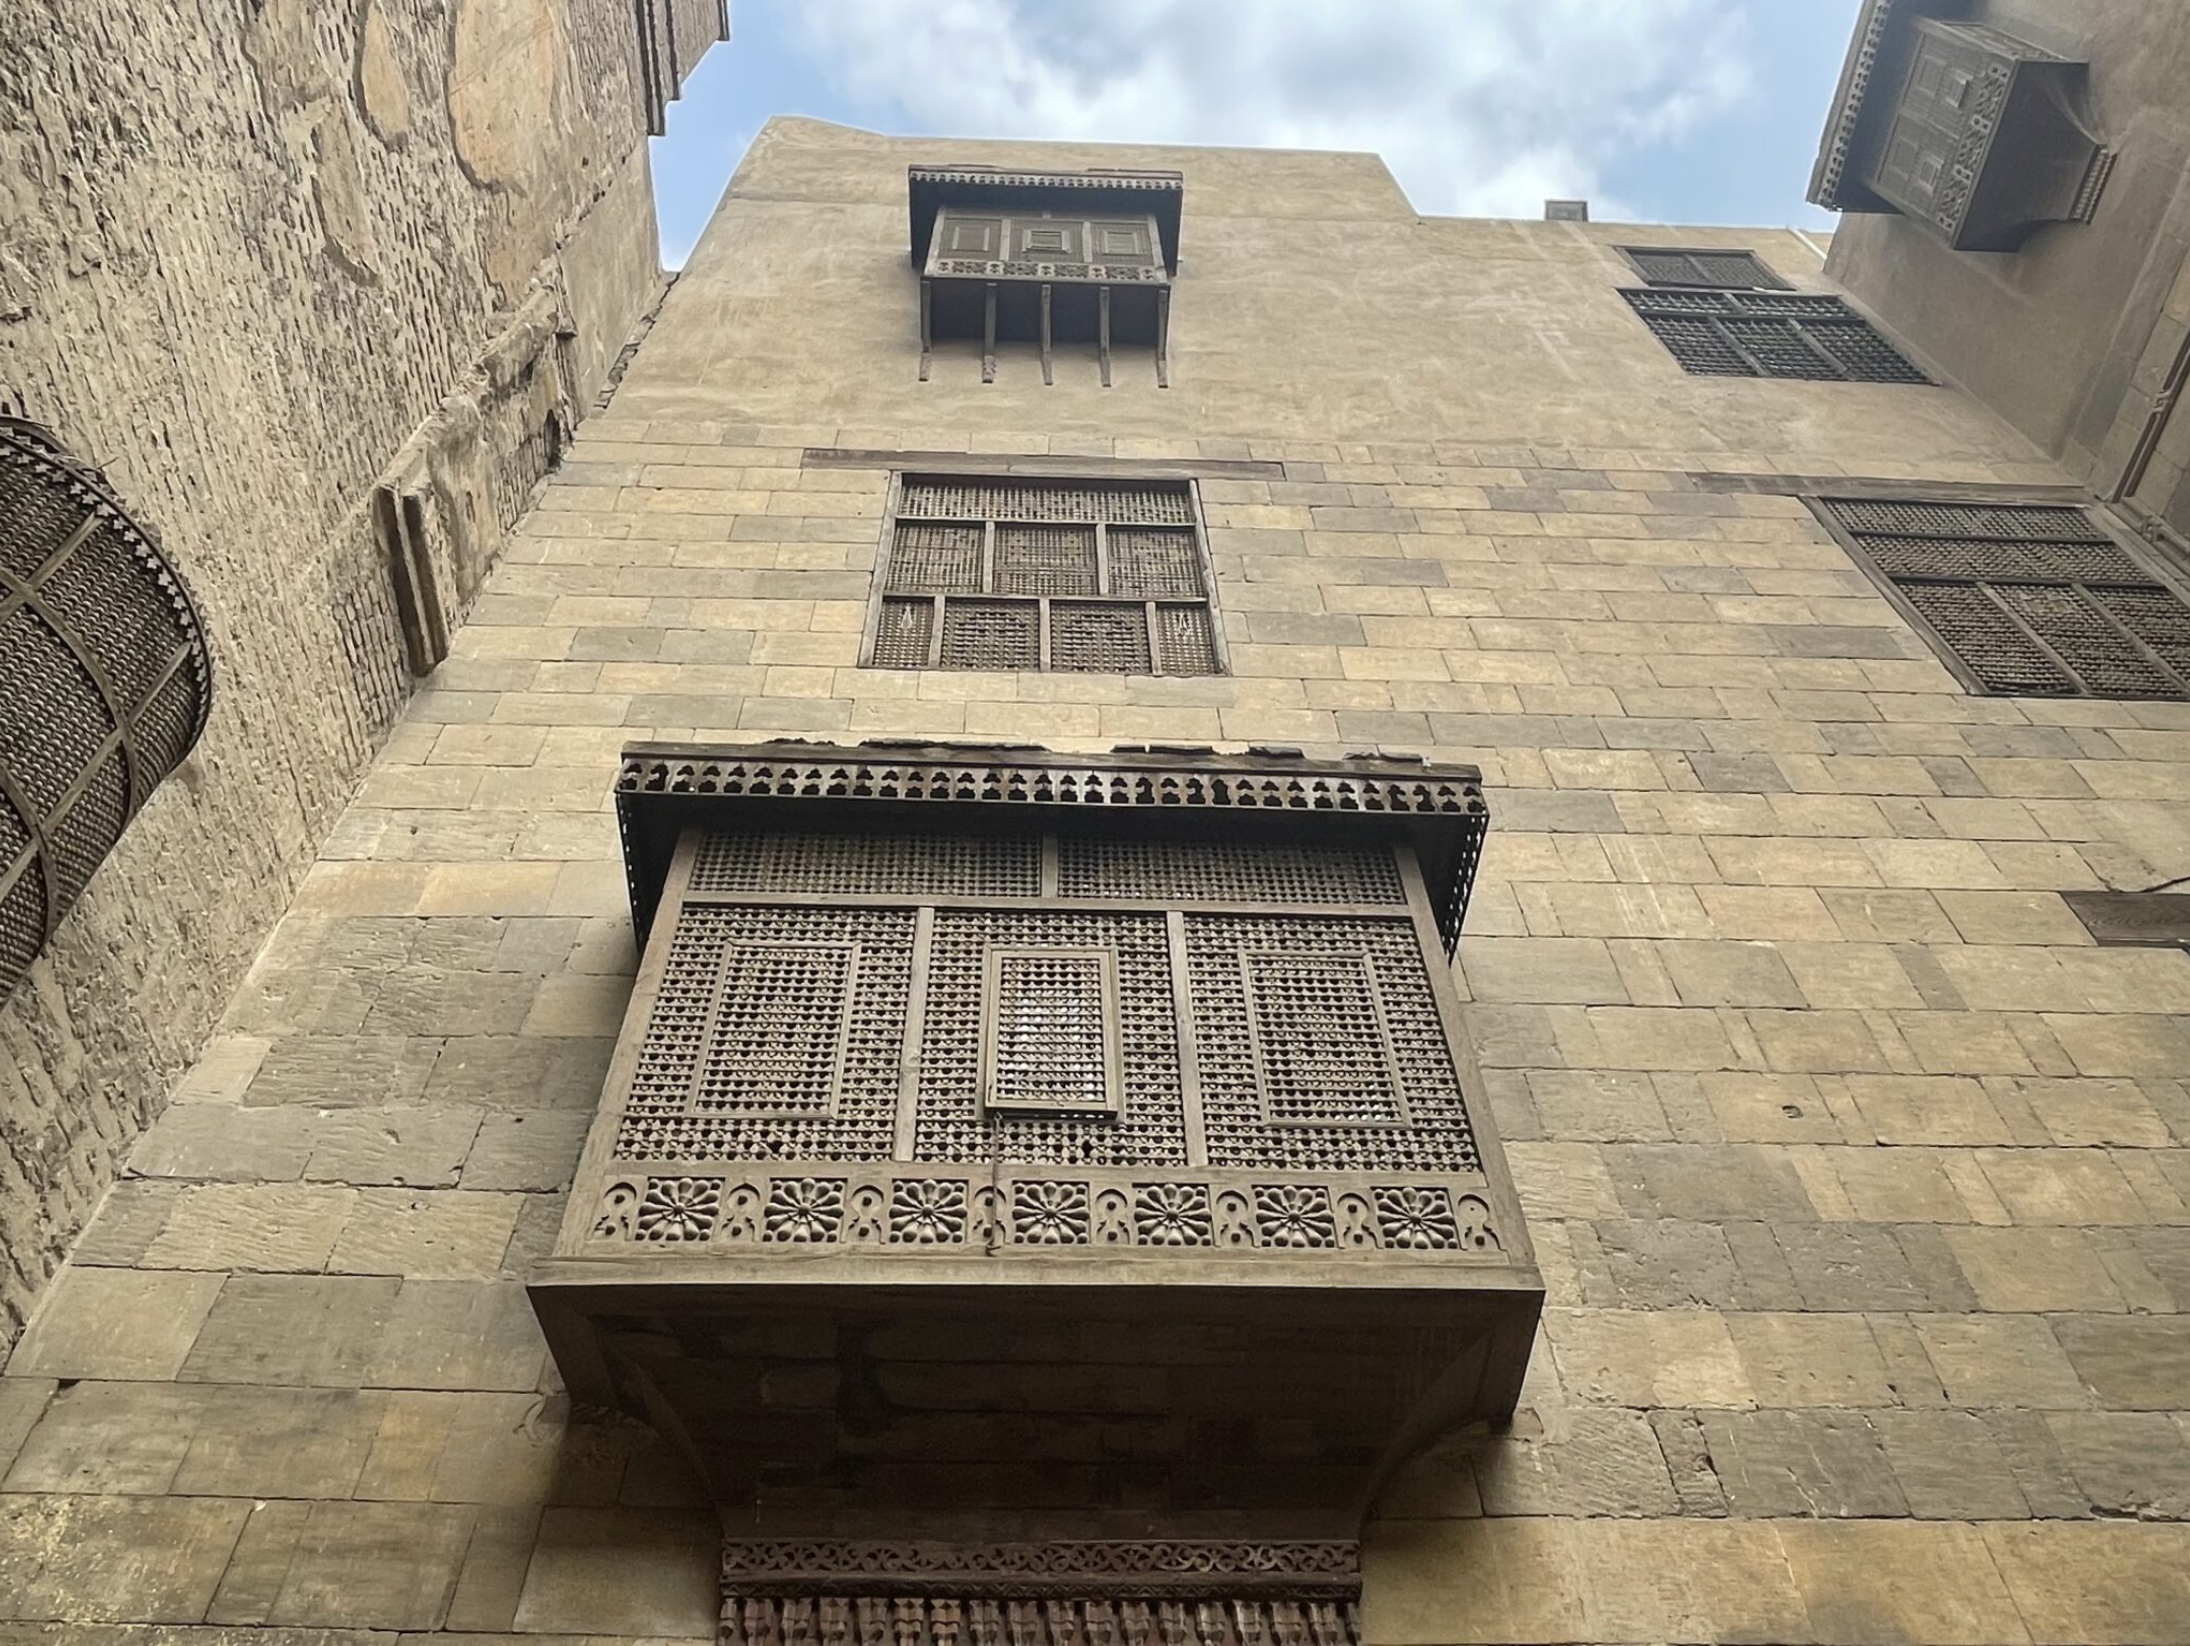
21st Century Mashrabiya
A Mashrabiya with A/C and climate-related sensors which combines the traditional Egyptian lattice window designs with modern technology for 21st century use.
Denounced by Diana: too complex.

Map of Cairo as a Circuit Board
Recreating the city of Cairo as a large 24" x 35" circuit board. The circuit pathways would be the streets of Cairo, while the different components would be the buildings.
Denounced by Anthony: not feasible,
but led to another idea!

Helicopter Dashboard
Builds on top of my previous project of converting the map of the Temple of Abydos (where helicopter hieroglyphs where discovered) into a helicopter dashboard.
Denounced by Prof. Neil: too similar.
The Epiphany of the Epithet

How it Happened
It was during a morning when I was on ChatGPT and asked it “How would I make the map of Egypt as a printed circuit board?” and it gave me so-and-so results. Then as I began leaving my house to head over to my finance class, I did my daily routine of asking Siri “Hey Siri, what’s the weather today in Celsius?” That’s when I realized I wanted to do something that’s AI-powered. I began chatting with my friend Javier Diaz about the idea of having some kind of AI assistant, more than what Amazon’s Alexa and Apple’s Siri would be, like an actual advisor. He responded: “like J.A.R.V.I.S. from Iron Man?” That’s when it hit me and I knew exactly what I wanted to do.
I was going to make AI-Powered Social and Economic Development Advisor for Egypt.
Egypt is known as the Mother of the World so I’d create it as a Motherboard.
Delivers on Demand and Desire
Demand
2D and 3D design: Standing Tablet 🟢
Additive and subtractive fabrication processes: Engravings 🟢
Electronics design and production: PCB 🟢
Embedded microcontroller design: ESP-WROOM-32 🟢
Interfacing: PCB 🟢
Programming: Economic Indicators displayed on OLEDs 🟢
System integration: PCB in 3D Printed Casing with Acrylic Screen 🟢
Packaging: Tablet Design in style of Egyptian Monument 🟢
Desire
Represents Egypt’s cultural diversity and technological distinction ✅
Relates to my backgrounds in city planning, computer science, and economics/finance ✅
Incorporates artificial intelligence ✅
Transforms fiction into reality ✅
Can be presented as a gift to the our leader, President Abdelfattah El-Sisi ✅
Something that can be described in a sentence ✅
Can be easily made by others if given the build instructions and code ✅
The Works
— The Blueprint —
The Design
The Vision
My flagship series of projects has been forming a fusion of ancient architectural mapping with modern technology via the striking similarities between ancient Egyptian structures and modern circuit boards. But, I’ve never done the map of Egypt itself, that would call for an unorthodox cut-out of a printed circuit board (PCB). The problem is this wouldn’t easily allow for it to be a dashboard and an irregularly map-shaped tablet wouldn’t be as functional. This calls for the creation of two separate PCBs, one that was aesthetic and distinct, the other to be functional and useful. But how would I make this work? I laid out a blueprint by combing images on a iPad layout to start a process of elimination to see what would not work until I figured out what would work.
Back
This is the side that is seen by the people, the audience, and whoever is on the other side of the screen. The map will also be a PCB, how would we put it in there is the challenge. Here is my thinking:
Make the main PCB have a cut-out then place the map PCB inside and continue the circuit. ❌ Too Complex
Make the main PCB double-sided one side with dashboard and the other side attaches to the map-shaped PCB. ✅

Front
This is the side that is seen by the President, the decision maker, or whoever is on the viewer side of the screen. How do I orient so much information and different economic indicators on one single side:
One big screen that takes us the whole PCB and program it accordingly ❌ Too Expensive & Too Boring
Multiple OLEDs that take up the entire screen ❌ Pin Limits
A combination of OLEDs for small indicators and medium TFT Displays for main indicators ✅
The Map PCB
I picked a photo of a vector of the map of Egypt from a quick Google search, picking the smoothest one with no city names or governorate boundaries then opened it in Adobe Illustrator to cover the remaining words/art and I converted it into a precise vector file, by using Image Trace, ensuring clean outlines suitable for PCB design. Then I typed in “EGYPT” in both Arabic and English.The final vector was optimized for milling, adding both the PCB shape and the layout to be milled on copper. It was exported as an SVG and PNG for it to be read by the machine.


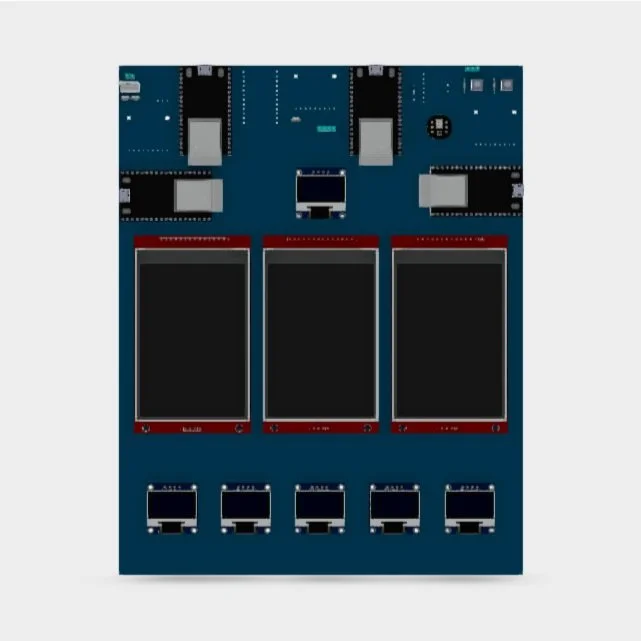
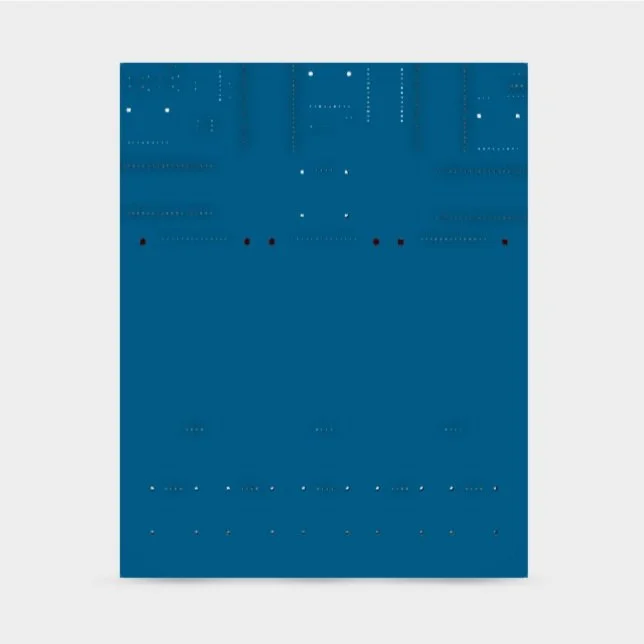
The Main PCB
I approached this by first putting all the screens EasyEDA to see what would fit and what wouldn’t. Initially it was meant to be the size of 32” inch Mac Screen, but then I began reducing the size to be the size of iPad after realizing it was going to cost $350 for JLC PCB to do something too big. I also had to keep in mind to make space for the other components that would be going on this board. After reorienting the screens and adjusting the amount of screens, I came up with the final and optimum amount: 5 OLEDs for small indicators, 1 OLED at the top to write out what the AI-Assistant is saying (speech-to-text), and 3 medium TFT Displays for the main indicators. Once the design was finalized I added text under each index or indicator that would be placed on the PCB, as well as, my initials and university “KHS MIT.” Now what was next was figuring out the components needed and placing them onto the board.


— The Function —
Selecting the Components
The Vision
I wanted to see if this was done before to get some form of inspirational guidance on how to build this. I began searching different terms but couldn’t find much until I realized that I should use a popular figure that people would know: “J.A.R.V.I.S.” and surely enough by searching “J.A.R.V.I.S. PCB” on youtube I got a few results. None were too descriptive, most projects done in the past were main on breadboards or something rustic (which Dr. Neil would never approve of). However, it did help a lot to get insights on what components I would need and pre-cursor of the type of code I would need to write. The youtuber’s videos that helped me the most are techiesms, placitech, and atomic14. Below are examples of what they built.
I began by defining my intended user experience and desired capabilities: my core functions involve capturing and interpreting voice commands, generating intelligent responses through ChatGPT, delivering those responses through both speech and on-screen text, and presenting key statistics and data as visual infographics. Once I identified these core functions, I began determining the necessary hardware—such as a microphone, processor, display, and speakers—and software components, including speech recognition APIs, ChatGPT integration, and graphic display libraries. I took suggestions on what components to use from ChatGPT, Youtubers, Redditors, and Arduino forum users.


The Main PCB
This is where the shopping list came in, I saw what we had in the inventory then ordered the remainder online whether it was from Adafruit or Amazon. The ESP32-WROOM-32E is the central microcontroller for the project, managing all data processing, communication, and interfacing with other components. Its powerful processor and built-in Wi-Fi capabilities make it ideal for handling the logic and real-time connectivity required for the personal assistant functionality. The 3.3V 250mA Linear Voltage Regulator ensures a stable power supply for sensitive components like the ESP32 and sensors, preventing voltage fluctuations that could compromise performance. A Tactile Button Switch (6mm) is included for physical interaction, such as resetting the device or activating specific functions manually. To store data like configuration files, logs, or media needed for the assistant's responses, the Micro SD SPI Card Breakout Board (3V) and a 512MB micro SD Memory Card are utilized, providing ample, accessible storage.
The Diffused RGB (Tri-color) LED offers a simple yet effective way to visually indicate the device's status, such as power, connectivity, or system errors. For dynamic lighting, the NeoPixel Reverse Mount RGB LEDs (SK6812-E) outline the Nile River on the map, creating an interactive and visually appealing design element that enhances the aesthetic of the device. The Adafruit I2S 3W Class D Amplifier Breakout (MAX98357A) drives the Mono Enclosed Speaker (3W, 8 Ohm), enabling clear audio output for verbal responses, which is crucial for the assistant's voice-interaction feature. Complementing this, the INMP441 I2S Omnidirectional Microphone captures high-quality voice input from the user, ensuring accurate speech recognition and enabling a seamless interaction.
For visual data display, the there’s the 0.96" OLED I2C Display Modules (128x64 Pixels) for specific metrics like population or currency and a 4.0" SPI LCD Display Module (480x320) for larger, detailed infographics and visual representations of critical statistics. The TCA9548A I2C Multiplexer allows the ESP32 to communicate with multiple I2C devices, ensuring the seamless operation of multiple displays and sensors on a shared bus. The Voltage Boost Converter steps up the voltage from the Lithium Ion Battery Pack (3.7V 6600mAh) to power high-demand components, ensuring consistent and reliable operation for all elements of the system. Additionally, Values Resistors and Ceramic Capacitors are employed to manage current flow and stabilize voltage levels, protecting the components and improving overall system reliability.


Mapping the Components
The Vision
After finalizing the selection of components and determining the layout of the screens on the PCB, I began mapping the placement of the remaining components, ensuring logical and efficient organization to minimize signal interference and maintain a clean design. With the components positioned, I moved on to the critical task of routing, carefully designing the connections between components while optimizing trace lengths and adhering to best practices for power delivery, data signal integrity, and grounding. This methodical process ensured that all components would work seamlessly together while maintaining the visual and functional objectives of the project. During this process, I realized I had to add an additional ESP32 and move things around even more.


Powering the Components
The Schematic
This schematic is organized to integrate the core components of a voice-assisted interactive system, anchored by the ESP32-WROOM-32E microcontroller. The ESP32 acts as the central hub, responsible for processing data, managing communication between devices, and coordinating system behavior. It operates at 3.3V, which is regulated and stabilized by a 3.3V 250mA Linear Voltage Regulator to prevent voltage fluctuations that could interfere with performance. This regulated voltage supplies power to critical components like the ESP32, sensors, and displays.
The ESP32 communicates with multiple I2C devices, orchestrated by the TCA9548A I2C Multiplexer. This multiplexer expands the ESP32’s I2C capabilities, enabling it to interact seamlessly with multiple peripherals such as the 0.96" OLED I2C Display Modules (128x64 Pixels) and other I2C-based sensors or controllers. The OLED displays are used for showing concise metrics like population or currency, while a 4.0" SPI LCD Display Module (480x320) connects via SPI communication for larger, detailed visual outputs such as infographics. This dual-display setup balances readability for both quick and detailed data presentations.
For user interaction, the schematic includes an INMP441 I2S Omnidirectional Microphone to capture voice input, sending clean audio data to the ESP32 for processing and speech recognition. Correspondingly, an Adafruit I2S 3W Class D Amplifier Breakout (MAX98357A) drives the 3W, 8 Ohm Mono Enclosed Speaker, allowing the system to deliver clear, audible responses. Together, the microphone and amplifier form the core of the voice interaction functionality.
The visual appeal of the system is enhanced by two lighting solutions. The Diffused RGB (Tri-color) LED serves as a simple status indicator for power, connectivity, or system alerts, while the NeoPixel Reverse Mount RGB LEDs (SK6812-E) illuminate the Nile River design with dynamic and customizable lighting. These NeoPixels are individually addressable, allowing the ESP32 to control each LED to create visual effects that complement system operation.
A Micro SD SPI Card Breakout Board (3V), paired with a 512MB micro SD Memory Card, provides local storage for system configuration files, logs, or media required for responses. The ESP32 accesses this storage via SPI communication, ensuring reliable data retrieval when needed. A Tactile Button Switch (6mm) is included for manual system resets or triggering specific actions, offering physical interaction when necessary.
Power management is critical to the design, with a Voltage Boost Converter stepping up the voltage from the 3.7V Lithium Ion Battery Pack (6600mAh) to meet the demands of high-power components like the amplifier and displays. This ensures consistent power delivery and extends operational reliability. Supporting components such as ceramic capacitors and resistors are strategically placed throughout the schematic to stabilize voltages, filter noise, and protect circuits from current surges.
The schematic’s organization reflects careful consideration for modularity, efficiency, and reliability. The ESP32’s central role, supported by the I2C multiplexer, SPI devices, and power regulation components, allows the system to handle voice interaction, dynamic displays, and lighting control seamlessly. This layout ensures the smooth operation of multiple peripherals while maintaining power stability and scalability for future enhancements.

— The Packaging —
Pre-Design Actions
Practicality Comes First
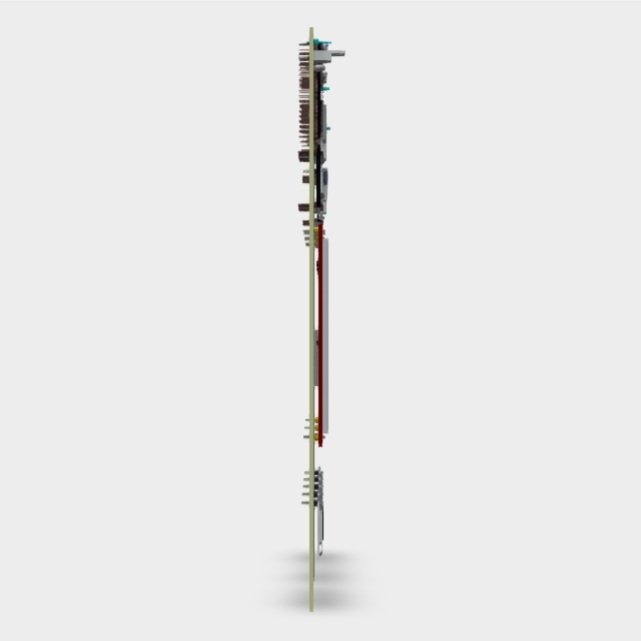
While I was excited to just jump straight into the design, I had to think of a few things first to ensure that this remained functional. I had the height (y) and width (x), but I did not have the depth (z). The depth is important for me to understand how much of a distance I need to create for the frame to hold the PCB in place. I generated STP files using Fusion 360 to see the 3D model of my PCB to get a better idea of depth and laid them out like a mugshot to understand how the components will stick out or be placed.

Aesthetic vs. Function
When designing the casing, I carefully balanced aesthetics with functionality to ensure that the components would seamlessly integrate while maintaining their visual appeal. The precise placement of cutouts and connectors was determined by the functional requirements—ensuring the ESP32, OLED modules, and input/output devices had direct, unobstructed access to their corresponding slots. At the same time, I adhered to a clean, organized layout to reflect the elegance of the system and provide intuitive accessibility. This approach ensured that while the design remained visually cohesive and polished, it also fulfilled the technical demands for connectivity, airflow, and alignment of the key components, ultimately marrying form with purpose.


Designing the Casing and Enclosure
Gathering Inspiration
I was looking for a design that naturally conveyed the idea of a "case" while also drawing on a sense of history and cultural significance. Initially, my thoughts leaned toward the cartouche—a classic symbol of protection and identity in Ancient Egypt. But as I explored further, I realized that the monumental Gate of the Karnak Temple could serve as an even more compelling source of inspiration. This gate, with its commanding presence and intricate detailing, embody strength, functionality, and heritage, making it a perfect metaphor for a case design that protects while honoring the ingenuity of the past.
Initially, I was going to remake the same engravings as the temple’s gate, which was the reliefs of Ancient Egyptian Gods and Pharaohs. I spent hours looking for different photos to find hight quality photos of the reliefs, but couldn’t. Then tried to pick and choose other reliefs of well-known kings and queens—Narmer, Ramses II, Akhenaten, Thutmose III, Hatshepsut, Cleopatra, and Nefertiti—that were in the form illustrations, but couldn’t find enough images that were free stock or high quality. After contemplating about how to proceed, I realized I didn’t really want to do these illustrations and wanted to make something different, something truly my own, and something that represented 6,000 years of Egypt’s diverse history and cultures. It had to be elegant and iconic, then I realized I already had the resources, it was the logo of my old company, Expo Egypt, which truly represented Egypt. The Desert for Egypt’s nature and land that has continue to exist throughout the ages and is home to Egypt’s Bedouins, the Papyrus and Lotus symbolize Ancient Egypt’s connection to the Nile and its legacy of rebirth and innovation, the Seashells that celebrates Egypt’s Coptic Christian heritage that are a symbol of faith and baptism, the Triangles design that reflect Nubian architectural ingenuity and cultural significance, and the Geometrical Arabesque patterns and ornaments found on the doors of Mosques to represent Egypt’s significant importance as the center and capital of multiple generations of Islamic empires and the gateway to Africa.


Planning out the Design, Integration, and Assembly
Designing the casing around the PCB was a meticulous process of balancing precision, aesthetics, and functionality. I started by establishing the dimensions of the PCB itself—215 mm wide, 280 mm tall, with components demanding both front and back clearances. These measurements set the foundation for the casing's external proportions, which required a minimal yet functional depth to accommodate the thickest components, such as the battery (18 mm) and speakers (17 mm), ensuring there was enough space for airflow and connectivity.
From there, I identified zones of interaction—areas on the PCB that required direct access, such as the OLED screens, buttons, and connectors. I divided the front surface into usable and covered regions, placing plexiglass where protection was needed while exposing critical access points. The next step was ensuring the wiring and power components were hidden for a clean appearance. I designed internal routing paths with concealed holes through the casing, so wires could flow seamlessly from the battery, speakers, and power hub (Anker) without compromising aesthetics.
On the side profile, I factored in the total thickness (1.6 mm PCB, 3 mm plexiglass) and allowed a 15 mm clearance from the front and back of the casing to ensure no components protruded. The rear side extended 190 mm upward, protected by plexiglass, leaving only an output hole exposed for essential power connections. For the top section, the speaker placement dictated the design, aligning precisely with slots while maintaining a consistent 36 mm column width for visual symmetry, inspired by architectural motifs.
Finally, I considered aesthetics by blending Ancient Egyptian design elements into the casing. The front took cues from monumental forms, resembling a gateway, while ensuring functional integrity. Every decision—internal routing, dimensions, and material selection—was a deliberate step to create a casing that not only housed the components securely but also told a visual story of precision, harmony, and cultural inspiration.


Designing the Casing
Initially, the frame was intended to be printed in two large pieces: one for the main body and another for the headpiece, which prominently features intricate carvings like the winged sun disk and decorative patterns. This approach ensured a smooth and cohesive assembly, minimizing joints and preserving the clean visual flow of the design.
However, during the design validation phase, I realized that the original two-piece concept was impractical due to the sheer size of the structure, which exceeded the build volume of the 3D printer. To resolve this, I divided the frame into four separate parts for the main gate and two pieces for the head of the gate. This modular breakdown allowed the individual components to fit within the printer’s constraints while maintaining their intricate detailing.
The plan was for these pieces to assemble seamlessly, as demonstrated in the digital model and video simulations. Smooth, interlocking joints were designed to ensure alignment and stability. However, what seemed perfect in the digital space presented real-world complications. The tolerances in the 3D printing process caused slight sizing issues, resulting in mismatches between the pieces. These small imperfections led to unexpected difficulties during assembly, particularly in achieving the smooth fit and structural integrity I had initially envisioned, which is discussed later.
Despite these challenges, the case remained an impressive and functional homage to the gate design. The intricate carvings on the headpiece and the ornate paneling on the frame reflect the careful attention to detail, elevating the project’s visual appeal while serving as a functional housing for the device. These hurdles underscored the balance between design intent and practical fabrication, providing valuable insights for future iterations.


The Build
— The Tale of the Two PCBs —
For Context: Practical and Aesthetic
This was a big PCB board, the practical, logical, efficient thing to do was to order it from JLC PCB and have them get it done in a matter of 24 hours (2 days because of the Black PCB color). This is also what the TAs advised, so that is what I did. I discussed it with Professor Neil to understand his thoughts about the matter. He agreed.
Soldering, Soldering, and more Soldering
The PCB assembly was another time-consuming yet rewarding part of the project. Soldering each component—resistors, capacitors, connectors, and the microcontroller—required precision and patience to ensure every joint was solid and reliable. Despite the meticulous effort it demanded, all the components came together seamlessly, and I took extra care to verify each connection. Ensuring the solder points were clean and secure paid off, as the board functioned perfectly, providing a strong foundation for the rest of the system.

— The 3D Printed Case: Challenges, Chaos, and Cures —
Beauty came with pain
My Delusional Expectations
I started this part of the project with the delusional confidence that it would be the smoothest phase, given my experience with 3D printing and familiarity with the process. The steps seemed almost laughably simple: design the STL, open it in Bambu or Prusa, slice the model, generate the G-code, upload it to the printer, and let the machine do its magic. In theory, it was a straightforward, almost mechanical sequence I’d done countless times before. I underestimated how quickly things could unravel—print failures, time constraints, and unexpected interruptions turned what should have been a routine process into a chaotic marathon, proving that even the most familiar tasks can spiral out of control when circumstances align against you.


Challenges
The process of creating the casing started with an ambitious design that quickly revealed its obstacles. Once I divided the original gate design into six pieces to accommodate the 3D printer’s build volume, I realized that 3D printing each piece would take much longer than expected. After blending the files to prepare them for the Bambu Printer, the estimated print times soared, far exceeding what I could afford given the tight schedule. To make matters worse, the frame’s intricate carvings and delicate designs, particularly the hieroglyphic patterns and the winged sun disk, required a high-quality print setting. Lowering the quality wasn’t an option, as it would strip away the detail that defined the project’s aesthetic. Adding to the pressure, the sheer number of pieces—six in total—meant I couldn’t print everything in one go, forcing me to manage a staggered print schedule that left very little room for error. I was expecting each part to take a maximum of 5 hours each, I had never printed something as big and that’s why I miscalculated it. I should have began printing a day earlier.
Chaos
Things quickly spiraled into chaos as unexpected failures started piling up. Twice, one of my prints devolved into a tangled mess of filament—commonly known as a spaghetti print—leaving me with wasted time and resources. Just as I regained momentum, another disaster struck: someone randomly cancelled one of my prints after it had been running for 11 hours with only 5 hours remaining. Nour and Nathaniel both experienced me confront this situation, it was a complete disaster: a random student with an ego and power complex who decided to cancel other students projects without saying anyhting. The biggest problem with this is it sounded like “my dog ate my homework,” Professor Neil wasn’t going to buy it, so I knew I could only push through. This single act set me back tremendously, as I had to restart an already lengthy print. When I attempted to recover by running a replacement print, the filament ran out halfway through, bringing production to a screeching halt yet again. Then, in the final stages, with time running out, the assembly revealed another problem—pieces weren’t fitting together due to small printing inaccuracies. At this point, panic set in as I scrambled to fix issues with only hours to spare before the deadline.
Cures
Through a combination of quick thinking, teamwork, and persistence, I managed to overcome each chaotic hurdle. When the filament ran out mid-print, I carefully analyzed where the failure occurred, counted 15 squares to pinpoint the stopping point, and chopped up the file to print the remaining section separately on another printer. xdd44 jumped in to help replace the filament and offered me his unused printer, giving me a much-needed time cushion. To avoid further interruptions, Nour took it upon herself to monitor my prints, ensuring no one tampered with them while I worked in EECS and the prints continued in E52. Meanwhile, Quentin and Jake mobilized resources, bringing three printers from the CBA section to EECS, where I used two of them to speed up production. Nick provided guidance on reducing print time without compromising quality, allowing me to make faster progress while managing risk. In the final stretch, Anthony stayed with me to problem-solve the assembly, breaking and trimming pieces to force the PCB board into place. With time running out, we relied on hot glue to secure the pieces together, ensuring the frame held up as intended.


The Code
— The Voice Assistant and the 5 OLEDs —
-
// ------------------------------------------------------------------------------------------------------------------------------
// ------------------ Portable AI Voice Assistant Project by techiesms ------------------
// ---------------- Aug 28, 2024 ------------------
// ------------------ ------------------
// ------------------ This is the modified code and the ordignial code was ------------------
// ------------------ from KALOPROJECTS. A huge Shoutout to his amazing work ------------------
// KALO PROJECTS Github Repo - https://github.com/kaloprojects/KALO-ESP32-Voice-Assistant
// ------------------------------------------------------------------------------------------------------------------------------
// *** HINT: in case of an 'Sketch too Large' Compiler Warning/ERROR in Arduino IDE (ESP32 Dev Module):
// -> select a larger 'Partition Scheme' via menu > tools: e.g. using 'No OTA (2MB APP / 2MB SPIFFS) ***
/*
Library to be installed
ESP32 Audio I2S - https://github.com/schreibfaul1/ESP32-audioI2S
ArduinoJSON - https://arduinojson.org/?utm_source=meta&utm_medium=library.properties
SimpleTimer - https://github.com/kiryanenko/SimpleTimer
*/
#include <Wire.h>
#include <Adafruit_GFX.h>
#include <Adafruit_SSD1306.h>
#define SCREEN_WIDTH 128
#define SCREEN_HEIGHT 64
Adafruit_SSD1306 display1(SCREEN_WIDTH, SCREEN_HEIGHT, &Wire, -1);
Adafruit_SSD1306 display2(SCREEN_WIDTH, SCREEN_HEIGHT, &Wire, -1);
Adafruit_SSD1306 display3(SCREEN_WIDTH, SCREEN_HEIGHT, &Wire, -1);
Adafruit_SSD1306 display4(SCREEN_WIDTH, SCREEN_HEIGHT, &Wire, -1);
Adafruit_SSD1306 display5(SCREEN_WIDTH, SCREEN_HEIGHT, &Wire, -1);
Adafruit_SSD1306 display6(SCREEN_WIDTH, SCREEN_HEIGHT, &Wire, -1);
#define VERSION "\n=== KALO ESP32 Voice Assistant (last update: July 22, 2024) ======================"
#include <WiFi.h> // only included here
#include <SD.h> // also needed in other tabs (.ino)
#include <Audio.h> // needed for PLAYING Audio (via I2S Amplifier, e.g. MAX98357) with ..
// Audio.h library from Schreibfaul1: https://github.com/schreibfaul1/ESP32-audioI2S
// .. ensure you have actual version (July 18, 2024 or newer needed for 8bit wav files!)
#include <Arduino.h>
#include <WiFiClientSecure.h>
#include <ArduinoJson.h>
#include <SimpleTimer.h>
String text;
String filteredAnswer = "";
String repeat;
SimpleTimer Timer;
float batteryVoltage;
// --- PRIVATE credentials -----
const char* ssid = "SISI"; // ## INSERT your wlan ssid
const char* password = "Egypt100"; // ## INSERT your password
const char* OPENAI_KEY = "***************************************"; // ## optionally (needed for Open AI voices): INSERT your OpenAI key
const char* gemini_KEY = "AIzaSyDKT05JqPf5fXkpCgkFTNokIDRiZbWnscI"; //gemini api
#define TTS_MODEL 0 // 1 = OpenAI TTS; 0 = Google TTS
String OpenAI_Model = "gpt-3.5-turbo-instruct"; // Model
String OpenAI_Temperature = "0.20"; // temperature
String OpenAI_Max_Tokens = "100"; //Max Tokens
#define AUDIO_FILE "/Audio.wav" // mandatory, filename for the AUDIO recording
#define TTS_GOOGLE_LANGUAGE "en-IN" // needed for Google TTS voices only (not needed for multilingual OpenAI voices :) \
// examples: en-US, en-IN, en-BG, en-AU, nl-NL, nl-BE, de-DE, th-TH etc. \
// more infos: https://cloud.google.com/text-to-speech/docs/voices
// --- PIN assignments ---------
#define pin_RECORD_BTN 36
#define pin_VOL_POTI 34
#define pin_repeat 13
#define pin_LED_RED 15
#define pin_LED_GREEN 2
#define pin_LED_BLUE 4
#define pin_I2S_DOUT 25 // 3 pins for I2S Audio Output (Schreibfaul1 audio.h Library)
#define pin_I2S_LRC 26
#define pin_I2S_BCLK 27
// --- global Objects ----------
Audio audio_play;
// declaration of functions in other modules (not mandatory but ensures compiler checks correctly)
// splitting Sketch into multiple tabs see e.g. here: https://www.youtube.com/watch?v=HtYlQXt14zU
bool I2S_Record_Init();
bool Record_Start(String filename);
bool Record_Available(String filename, float* audiolength_sec);
String SpeechToText_Deepgram(String filename);
void Deepgram_KeepAlive();
//for battry
const int batteryPin = 34; // Pin 34 for battery voltage reading
const float R1 = 100000.0; // 100k ohm resistor
const float R2 = 10000.0; // 10k ohm resistor
const float adcMax = 4095.0; // Max value for ADC on ESP32
const float vRef = 3.4; // Reference voltage for ESP32
const int numSamples = 100; // Number of samples for averaging
const float calibrationFactor = 1.48; // Calibration factor for ADC reading
// ------------------------------------------------------------------------------------------------------------------------------
// Select I2C BUS for OLEDs
void TCA9548A(uint8_t bus){
Wire.beginTransmission(0x70); // TCA9548A address
Wire.write(1 << bus); // send byte to select bus
Wire.endTransmission();
Serial.print(bus);
}
void setup() {
// Initialize serial communication
Serial.begin(115200);
////////////////
// Start I2C communication with the Multiplexer
Wire.begin();
// Init OLED display on bus number 2 (display 1)
TCA9548A(1);
if(!display1.begin(SSD1306_SWITCHCAPVCC, 0x3C)) {
Serial.println(F("SSD1306 allocation failed"));
for(;;);
}
// Clear the buffer
display1.clearDisplay();
// Init OLED display on bus number 3
TCA9548A(2);
if(!display2.begin(SSD1306_SWITCHCAPVCC, 0x3C)) {
Serial.println(F("SSD1306 allocation failed"));
for(;;);
}
// Clear the buffer
display2.clearDisplay();
// Init OLED display on bus number 4
TCA9548A(3);
if(!display3.begin(SSD1306_SWITCHCAPVCC, 0x3C)) {
Serial.println(F("SSD1306 allocation failed"));
for(;;);
}
// Clear the buffer
display3.clearDisplay();
// Init OLED display on bus number 5
TCA9548A(4);
if(!display4.begin(SSD1306_SWITCHCAPVCC, 0x3C)) {
Serial.println(F("SSD1306 allocation failed"));
for(;;);
}
// Clear the buffer
display4.clearDisplay();
TCA9548A(6);
if(!display5.begin(SSD1306_SWITCHCAPVCC, 0x3C)) {
Serial.println(F("SSD1306 allocation failed"));
for(;;);
}
// Clear the buffer
display5.clearDisplay();
TCA9548A(7);
if(!display6.begin(SSD1306_SWITCHCAPVCC, 0x3C)) {
Serial.println(F("SSD1306 allocation failed"));
for(;;);
}
// Clear the buffer
display6.clearDisplay();
TCA9548A(7);
display6.setTextSize(9);
display6.setTextColor(WHITE);
display6.setCursor(0, 0);
// Display static text
display6.println("E");
display6.display();
TCA9548A(6);
display5.setTextSize(9);
display5.setTextColor(WHITE);
display5.setCursor(0, 0);
// Display static text
display5.println("G");
display5.display();
TCA9548A(4);
display4.setTextSize(9);
display4.setTextColor(WHITE);
display4.setCursor(0, 0);
// Display static text
display4.println("Y");
display4.display();
TCA9548A(3);
display3.setTextSize(9);
display3.setTextColor(WHITE);
display3.setCursor(0, 0);
// Display static text
display3.println("P");
display3.display();
TCA9548A(2);
display2.setTextSize(9);
display2.setTextColor(WHITE);
display2.setCursor(0, 0);
// Display static text
display2.println("T");
display2.display();
///////////////////////////////////////
Serial.setTimeout(100); // 10 times faster reaction after CR entered (default is 1000ms)
pinMode(batteryPin, INPUT);
analogReadResolution(12); // 12-bit ADC resolution
// Pin assignments:
pinMode(pin_LED_RED, OUTPUT);
pinMode(pin_LED_GREEN, OUTPUT);
pinMode(pin_LED_BLUE, OUTPUT);
pinMode(pin_RECORD_BTN, INPUT); // use INPUT_PULLUP if no external Pull-Up connected ##
pinMode(pin_repeat, INPUT);
pinMode(12, OUTPUT);
digitalWrite(12, LOW);
// on INIT: walk 1 sec thru 3 RGB colors (RED -> GREEN -> BLUE), then stay on GREEN
led_RGB(50, 0, 0);
delay(500);
led_RGB(0, 50, 0);
delay(500);
led_RGB(0, 0, 50);
delay(500);
led_RGB(0, 0, 0);
// Hello World
Serial.println(VERSION);
Timer.setInterval(10000);
// Connecting to WLAN
WiFi.mode(WIFI_STA);
WiFi.begin(ssid, password);
Serial.print("Connecting WLAN ");
while (WiFi.status() != WL_CONNECTED) {
Serial.print(".");
delay(500);
}
Serial.println(". Done, device connected.");
led_RGB(0, 50, 0); // GREEN
// Initialize SD card
if (!SD.begin()) {
Serial.println("ERROR - SD Card initialization failed!");
return;
}
// initialize KALO I2S Recording Services (don't forget!)
I2S_Record_Init();
// INIT Audio Output (via Audio.h, see here: https://github.com/schreibfaul1/ESP32-audioI2S)
audio_play.setPinout(pin_I2S_BCLK, pin_I2S_LRC, pin_I2S_DOUT);
audio_play.setVolume(100); //21
// INIT done, starting user interaction
Serial.println("> HOLD button for recording AUDIO .. RELEASE button for REPLAY & Deepgram transcription");
}
// ------------------------------------------------------------------------------------------------------------------------------
void loop() {
display1.clearDisplay();
display2.clearDisplay();
display3.clearDisplay();
display4.clearDisplay();
display5.clearDisplay();
display6.clearDisplay();
// Write to OLED on bus number 1
TCA9548A(7);
display6.setTextSize(1);
display6.setTextColor(WHITE);
display6.setCursor(0, 0);
// Display static text
display6.println("114,535,772");
display6.setCursor(0, 10);
// Display static text
display6.println("(2023)");
display6.display();
TCA9548A(6);
display5.setTextSize(1);
display5.setTextColor(WHITE);
display5.setCursor(0, 0);
// Display static text
display5.println("1 USD = 50.80 EGP");
display5.setCursor(0, 10);
// Display static text
display5.println("1 GBP = 64.15 EGP");
display5.setCursor(0, 20);
// Display static text
display5.println("1 EUR = 53.38 EGP");
display5.display();
TCA9548A(3);
display3.setTextSize(1);
display3.setTextColor(WHITE);
display3.setCursor(0, 0);
// Display static text
display3.println("PRODUCT");
display3.setCursor(0, 10);
// Display static text
display3.println("$53.9B | $95.7B");
display3.display();
TCA9548A(4);
display4.setTextSize(1);
display4.setTextColor(WHITE);
display4.setCursor(0, 0);
// Display static text
display4.println("33.3%");
display4.setCursor(0, 10);
// Display static text
display4.println("(2024)");
display4.display();
TCA9548A(2);
display2.setTextSize(1);
display2.setTextColor(WHITE);
display2.setCursor(0, 0);
// Display static text
display2.println("7.2%");
display2.setCursor(0, 10);
// Display static text
display2.println("(2024)");
display2.display();
delay(5000);
display1.clearDisplay();
display2.clearDisplay();
display3.clearDisplay();
display4.clearDisplay();
display5.clearDisplay();
display6.clearDisplay();
TCA9548A(7);
display6.setTextSize(1);
display6.setTextColor(WHITE);
display6.setCursor(0, 0);
// Display static text
display6.println("Growth Rate:");
display6.setCursor(0, 10);
// Display static text
display6.println("1.7%");
display6.display();
TCA9548A(6);
display5.setTextSize(1);
display5.setTextColor(WHITE);
display5.setCursor(0, 0);
// Display static text
display5.println("1 Month");
display5.setCursor(0, 10);
// Display static text
display5.println("-2.5%");
display5.display();
TCA9548A(3);
display3.setTextSize(1);
display3.setTextColor(WHITE);
display3.setCursor(0, 0);
// Display static text
display3.println("PER CAPITA");
display3.setCursor(0, 10);
// Display static text
display3.println("$486 | $862");
display3.display();
TCA9548A(4);
display4.setTextSize(1);
display4.setTextColor(WHITE);
display4.setCursor(0, 0);
// Display static text
display4.println("Year Increase");
display4.setCursor(0, 10);
// Display static text
display4.println("+30.9%");
display4.display();
TCA9548A(2);
display2.setTextSize(1);
display2.setTextColor(WHITE);
display2.setCursor(0, 0);
// Display static text
display2.println("Labor Force Participation");
display2.setCursor(0, 10);
// Display static text
display2.println("43.4%");
display2.display();
delay(5000);
display1.clearDisplay();
display2.clearDisplay();
display3.clearDisplay();
display4.clearDisplay();
display5.clearDisplay();
display6.clearDisplay();
TCA9548A(7);
display6.setTextSize(1);
display6.setTextColor(WHITE);
display6.setCursor(0, 0);
// Display static text
display6.println("2050:");
display6.setCursor(0, 10);
// Display static text
display6.println("161,630,192");
display6.setCursor(0, 20);
// Display static text
display6.println("(+41%)");
display6.display();
TCA9548A(6);
display5.setTextSize(1);
display5.setTextColor(WHITE);
display5.setCursor(0, 0);
// Display static text
display5.println("6 Month");
display5.setCursor(0, 10);
// Display static text
display5.println("-5.9%");
display5.display();
TCA9548A(3);
display3.setTextSize(1);
display3.setTextColor(WHITE);
display3.setCursor(0, 0);
// Display static text
display3.println("Main Exports:");
display3.setCursor(0, 10);
// Display static text
display3.println("Petrol Gas ($9.53B)");
display3.setCursor(0, 20);
// Display static text
display3.println("N-Fertilizer ($3.37B)");
display3.setCursor(0, 30);
// Display static text
display3.println("Refined Oil ($2.88B)");
display3.display();
TCA9548A(4);
display4.setTextSize(1);
display4.setTextColor(WHITE);
display4.setCursor(0, 0);
// Display static text
display4.println("Consumer Price Index");
display4.setCursor(0, 10);
// Display static text
display4.println("235.10");
display4.display();
TCA9548A(2);
display2.setTextSize(1);
display2.setTextColor(WHITE);
display2.setCursor(0, 0);
// Display static text
display2.println("Avg Yr Salary:");
display2.setCursor(0, 10);
// Display static text
display2.println("156,526 EGP");
display2.setCursor(0, 20);
// Display static text
display2.println("(5065.40 USD)");
display2.display();
delay(5000);
display1.clearDisplay();
display2.clearDisplay();
display3.clearDisplay();
display4.clearDisplay();
display5.clearDisplay();
display6.clearDisplay();
TCA9548A(7);
display6.setTextSize(1);
display6.setTextColor(WHITE);
display6.setCursor(0, 0);
// Display static text
display6.println("Age Distribution");
display6.setCursor(0, 10);
// Display static text
display6.println("0-14 = 15.7%");
display6.setCursor(0, 20);
// Display static text
display6.println("15-64 = 78.1%");
display6.setCursor(0, 30);
// Display static text
display6.println("65+ = 6.2%");
display6.display();
TCA9548A(6);
display5.setTextSize(1);
display5.setTextColor(WHITE);
display5.setCursor(0, 0);
// Display static text
display5.println("1Y");
display5.setCursor(0, 10);
// Display static text
display5.println("-48.46%");
display5.display();
TCA9548A(3);
display3.setTextSize(1);
display3.setTextColor(WHITE);
display3.setCursor(0, 0);
// Display static text
display3.println("Export Destination:");
display3.setCursor(0, 10);
// Display static text
display3.println("Turkey ($4.23B)");
display3.setCursor(0, 20);
// Display static text
display3.println("Italy ($3.32B)");
display3.setCursor(0, 30);
// Display static text
display3.println("USA ($3.21B)");
display3.display();
TCA9548A(4);
display4.setTextSize(1);
display4.setTextColor(WHITE);
display4.setCursor(0, 0);
// Display static text
display4.println("Producer Price Index");
display4.setCursor(0, 10);
// Display static text
display4.println("501.90");
display4.display();
TCA9548A(1);
display2.setTextSize(1);
display2.setTextColor(WHITE);
display2.setCursor(0, 0);
// Display static text
display2.println("Main occupation:");
display2.setCursor(0, 10);
// Display static text
display2.println("Services (52.98%)");
display2.setCursor(0, 20);
// Display static text
display2.println("Industry (28.66%)");
display2.setCursor(0, 30);
// Display static text
display2.println("Agriculture (18.66%)");
display2.display();
delay(5000);
display1.clearDisplay();
display2.clearDisplay();
display3.clearDisplay();
display4.clearDisplay();
display5.clearDisplay();
display6.clearDisplay();
TCA9548A(7);
display6.setTextSize(1);
display6.setTextColor(WHITE);
display6.setCursor(0, 0);
// Display static text
display6.println("Female | Male");
display6.setCursor(0, 10);
// Display static text
display6.println("49.43% | 50.57%");
display6.display();
TCA9548A(6);
display5.setTextSize(1);
display5.setTextColor(WHITE);
display5.setCursor(0, 0);
// Display static text
display5.println("5Y");
display5.setCursor(0, 10);
// Display static text
display5.println("-103.8%");
display5.display();
TCA9548A(3);
display3.setTextSize(1);
display3.setTextColor(WHITE);
display3.setCursor(0, 0);
// Display static text
display3.println("Main Imports:");
display3.setCursor(0, 10);
// Display static text
display3.println("Refined Oil ($6.33B)");
display3.setCursor(0, 20);
// Display static text
display3.println("Wheat ($4.82B)");
display3.setCursor(0, 30);
// Display static text
display3.println("Crude Oil ($3.87B)");
display3.display();
TCA9548A(4);
display4.setTextSize(1);
display4.setTextColor(WHITE);
display4.setCursor(0, 0);
// Display static text
display4.println("Money Supply Growth");
display4.setCursor(0, 10);
// Display static text
display4.println("+29.6%");
display4.display();
TCA9548A(1);
display2.setTextSize(1);
display2.setTextColor(WHITE);
display2.setCursor(0, 0);
// Display static text
display2.println("Youth Unemployment EDU");
display2.setCursor(0, 10);
// Display static text
display2.println("Primary: 12%");
display2.setCursor(0, 20);
// Display static text
display2.println("Prep: 13%");
display2.setCursor(0, 30);
// Display static text
display2.println("Secondary: 34%");
display2.display();
delay(5000);
display1.clearDisplay();
display2.clearDisplay();
display3.clearDisplay();
display4.clearDisplay();
display5.clearDisplay();
display6.clearDisplay();
TCA9548A(7);
display6.setTextSize(1);
display6.setTextColor(WHITE);
display6.setCursor(0, 0);
// Display static text
display6.println("Fertility rate");
display6.setCursor(0, 10);
// Display static text
display6.println("2.88");
display6.display();
TCA9548A(6);
display5.setTextSize(1);
display5.setTextColor(WHITE);
display5.setCursor(0, 0);
// Display static text
display5.println("MAX");
display5.setCursor(0, 10);
// Display static text
display5.println("-159.4%");
display5.display();
TCA9548A(3);
display3.setTextSize(1);
display3.setTextColor(WHITE);
display3.setCursor(0, 0);
// Display static text
display3.println("Import Partners:");
display3.setCursor(0, 10);
// Display static text
display3.println("China ($16.7B)");
display3.setCursor(0, 20);
// Display static text
display3.println("USA ($6.61B)");
display3.setCursor(0, 30);
// Display static text
display3.println("KSA ($6.44B)");
display3.display();
TCA9548A(4);
display4.setTextSize(1);
display4.setTextColor(WHITE);
display4.setCursor(0, 0);
// Display static text
display4.println("Unit Labor Cost");
display4.setCursor(0, 10);
// Display static text
display4.println("Median | Average");
display4.setCursor(0, 20);
// Display static text
display4.println("0.58 | 1.27");
display4.setCursor(0, 20);
// Display static text
display4.println("(2018)");
display4.display();
TCA9548A(1);
display2.setTextSize(1);
display2.setTextColor(WHITE);
display2.setCursor(0, 0);
// Display static text
display2.println("Avg Duration:");
display2.setCursor(0, 10);
// Display static text
display2.println("49 Months");
display2.display();
delay(5000);
here:
if (digitalRead(pin_RECORD_BTN) == LOW) // Recording started (ongoing)
{
led_RGB(50, 0, 0); // RED means 'Recording ongoing'
delay(30); // unbouncing & suppressing button 'click' noise in begin of audio recording
// Before we start any recording we stop any earlier Audio Output or streaming (e.g. radio)
if (audio_play.isRunning()) {
audio_play.connecttohost(""); // 'audio_play.stopSong()' wouldn't be enough (STT wouldn't reconnect)
}
//Start Recording
Record_Start(AUDIO_FILE);
}
if (digitalRead(pin_RECORD_BTN) == HIGH) // Recording not started yet .. OR stopped now (on release button)
{
led_RGB(0, 0, 0);
float recorded_seconds;
if (Record_Available(AUDIO_FILE, &recorded_seconds)) // true once when recording finalized (.wav file available)
{
if (recorded_seconds > 0.4) // ignore short btn TOUCH (e.g. <0.4 secs, used for 'audio_play.stopSong' only)
{
// ## Demo 1 - PLAY your own recorded AUDIO file (from SD card)
// Hint to 8bit: you need AUDIO.H library from July 18,2024 or later (otherwise 8bit produce only loud (!) noise)
// we commented out Demo 1 to jump to Demo 2 directly .. uncomment once if you want to listen to your record !
/*audio_play.connecttoFS(SD, AUDIO_FILE ); // play your own recorded audio
while (audio_play.isRunning()) {audio_play.loop();} // wait here until done (just for Demo purposes) */
// ## Demo 2 [SpeechToText] - Transcript the Audio (waiting here until done)
// led_RGB(HIGH, HIGH, LOW); // BLUE means: 'Deepgram server creates transcription'
String transcription = SpeechToText_Deepgram(AUDIO_FILE);
//led_RGB(HIGH, LOW, HIGH); // GREEN means: 'Ready for recording'
String again = "Please Ask Again . . . . . . . . . . . ";
Serial.println(transcription);
if (transcription == "") {
led_RGB(0, 0, 255);
if (TTS_MODEL == 1)
audio_play.openai_speech(OPENAI_KEY, "tts-1", again, "shimmer", "mp3", "1"); //ONYX,shimmer,alloy (Uncomment this to use OpenAI TTS)
else
speakTextInChunks(again, 93); // ( Uncomment this to use Google TTS )
Serial.println("Please Ask Again");
while (audio_play.isRunning()) // wait here until finished (just for Demo purposes, before we play Demo 4)
{
audio_play.loop();
}
goto here;
}
//----------------------------------------------------
WiFiClientSecure client;
client.setInsecure(); // Disable SSL verification for simplicity (not recommended for production)
String Answer = ""; // Declare Answer variable here
text = "";
if (client.connect("generativelanguage.googleapis.com", 443)) {
String url = "/v1beta/models/gemini-1.5-flash:generateContent?key=" + String(gemini_KEY);
String payload = String("{\"contents\": [{\"parts\":[{\"text\":\"" + transcription + "\"}]}],\"generationConfig\": {\"maxOutputTokens\": " + OpenAI_Max_Tokens + "}}");
// Send the HTTP POST request
client.println("POST " + url + " HTTP/1.1");
client.println("Host: generativelanguage.googleapis.com");
client.println("Content-Type: application/json");
client.print("Content-Length: ");
client.println(payload.length());
client.println();
client.println(payload);
// Read the response
String response;
while (client.connected()) {
String line = client.readStringUntil('\n');
if (line == "\r") {
break;
}
}
// Read the actual response
response = client.readString();
parseResponse(response);
} else {
Serial.println("Connection failed!");
}
client.stop(); // End the connection
//----------------------------------------------------
if (filteredAnswer != "") // we found spoken text .. now starting Demo examples:
{
led_RGB(0, 0, 255);
Serial.print("OpenAI speaking: ");
Serial.println(filteredAnswer);
if (TTS_MODEL == 1)
audio_play.openai_speech(OPENAI_KEY, "tts-1", filteredAnswer.c_str(), "shimmer", "mp3", "1"); //ONYX,shimmer,alloy (Uncomment this to use OpenAI TTS)
else
speakTextInChunks(filteredAnswer, 93); // ( Uncomment this to use Google TTS )
}
}
}
}
//for repeat-------------------------
if (digitalRead(pin_repeat) == LOW) {
delay(500);
analogWrite(pin_LED_BLUE, 255);
Serial.print("repeat - ");
Serial.println(repeat);
if (TTS_MODEL == 1)
audio_play.openai_speech(OPENAI_KEY, "tts-1", repeat, "shimmer", "mp3", "1"); //ONYX,shimmer,alloy (Uncomment this to use OpenAI TTS)
else
speakTextInChunks(repeat, 93); // ( Uncomment this to use Google TTS )
}
audio_play.loop();
if (audio_play.isRunning()) {
analogWrite(pin_LED_BLUE, 255);
if (digitalRead(pin_RECORD_BTN) == LOW) {
goto here;
}
} else {
analogWrite(pin_LED_BLUE, 0);
}
String batt = "Good afternoon Professor Neil, I am an AI-Powered Economic Advisor made by Kareem El-Sisi for his Final Project. I was made as a gift to the President of Egypt and have been programmed to help His Excellency with whatever he needs. On my screen you will see indicators to understand the progress and development of the nation, including World Governance Indicators, Human Development Index, and Sustainable Development Goals. I also have up-to-date data and stats on Population, Currency, Inflation, Exports and Imports, and Unemployment. If you would like to ask me a question, press the record button and speak to me. I will then respond, if you don't like my response, press the replay button and I will think again about the question and create a new response. Thank you for listening to me introducing myself. God Bless Egypt. Long Live the President. You may now proceed to ask me your question.";
if (Timer.isReady()) {
battry_filtering();
Serial.print("Battery Voltage: ");
Serial.println(batteryVoltage);
if (batteryVoltage < 3.4) {
if (TTS_MODEL == 1)
audio_play.openai_speech(OPENAI_KEY, "tts-1", batt.c_str(), "shimmer", "mp3", "1");
else
speakTextInChunks(batt.c_str(), 93); // ( Uncomment this to use Google TTS )
}
Timer.reset();
}
// Schreibfaul1 loop für Play Audio
// [Optional]: Stabilize WiFiClientSecure.h + Improve Speed of STT Deepgram response (~1 sec faster)
// Idea: Connect once, then sending each 5 seconds dummy bytes (to overcome Deepgram auto-closing 10 secs after last request)
// keep in mind: WiFiClientSecure.h still not 100% reliable (assuming RAM heap issue, rarely freezes after e.g. 10 mins)
if (digitalRead(pin_RECORD_BTN) == HIGH && !audio_play.isRunning()) // but don't do it during recording or playing
{
static uint32_t millis_ping_before;
if (millis() > (millis_ping_before + 5000)) {
millis_ping_before = millis();
led_RGB(0, 0, 0); // short LED OFF means: 'Reconnection server, can't record in moment'
Deepgram_KeepAlive();
}
}
}
void speakTextInChunks(String text, int maxLength) {
int start = 0;
while (start < text.length()) {
int end = start + maxLength;
// Ensure we don't split in the middle of a word
if (end < text.length()) {
while (end > start && text[end] != ' ' && text[end] != '.' && text[end] != ',') {
end--;
}
}
// If no space or punctuation is found, just split at maxLength
if (end == start) {
end = start + maxLength;
}
String chunk = text.substring(start, end);
audio_play.connecttospeech(chunk.c_str(), TTS_GOOGLE_LANGUAGE);
while (audio_play.isRunning()) {
audio_play.loop();
if (digitalRead(pin_RECORD_BTN) == LOW) {
break;
}
}
start = end + 1; // Move to the next part, skipping the space
// delay(200); // Small delay between chunks
}
}
// ------------------------------------------------------------------------------------------------------------------------------
// Revised section to handle response parsing
void parseResponse(String response) {
repeat = "";
// Extract JSON part from the response
int jsonStartIndex = response.indexOf("{");
int jsonEndIndex = response.lastIndexOf("}");
if (jsonStartIndex != -1 && jsonEndIndex != -1) {
String jsonPart = response.substring(jsonStartIndex, jsonEndIndex + 1);
// Serial.println("Clean JSON:");
// Serial.println(jsonPart);
DynamicJsonDocument doc(1024); // Increase size if needed
DeserializationError error = deserializeJson(doc, jsonPart);
if (error) {
Serial.print("DeserializeJson failed: ");
Serial.println(error.c_str());
return;
}
if (doc.containsKey("candidates")) {
for (const auto& candidate : doc["candidates"].as<JsonArray>()) {
if (candidate.containsKey("content") && candidate["content"].containsKey("parts")) {
for (const auto& part : candidate["content"]["parts"].as<JsonArray>()) {
if (part.containsKey("text")) {
text += part["text"].as<String>();
}
}
text.trim();
// Serial.print("Extracted Text: ");
// Serial.println(text);
filteredAnswer = "";
for (size_t i = 0; i < text.length(); i++) {
char c = text[i];
if (isalnum(c) || isspace(c) || c == ',' || c == '.' || c == '\'') {
filteredAnswer += c;
} else {
filteredAnswer += ' ';
}
}
// filteredAnswer = text;
// Serial.print("FILTERED - ");
//Serial.println(filteredAnswer);
repeat = filteredAnswer;
}
}
} else {
Serial.println("No 'candidates' field found in JSON response.");
}
} else {
Serial.println("No valid JSON found in the response.");
}
}
void led_RGB(int red, int green, int blue) {
static bool red_before, green_before, blue_before;
// writing to real pin only if changed (increasing performance for frequently repeated calls)
if (red != red_before) {
analogWrite(pin_LED_RED, red);
red_before = red;
}
if (green != green_before) {
analogWrite(pin_LED_GREEN, green);
green_before = green;
}
if (blue != blue_before) {
analogWrite(pin_LED_BLUE, blue);
blue_before = blue;
}
}
void battry_filtering() {
float adcValueSum = 0;
// ADC Averaging
for (int i = 0; i < numSamples; i++) {
adcValueSum += analogRead(batteryPin);
delay(2);
}
float adcValueAvg = adcValueSum / numSamples;
batteryVoltage = adcValueAvg (vRef / adcMax) calibrationFactor;
batteryVoltage = batteryVoltage * ((R1 + R2) / R2);
// Publishing the calculated battery voltage to Adafruit IO
Serial.print("Battery Voltage: ");
Serial.println(batteryVoltage);
//photocell.publish(batteryVoltage);
}
-
Error 1: Mix up between the schematic and routing vs. the code of how I labelled the screens.
Fix: Reassignment of screens and correct labelling
Error 2: The accent is Indian due to the original developer being Indian, its not really on-brand for me.
Fix: Switch to a US accent.
Error 3: The top screen is displaying information that should go on another screen.
Fix: Correction of code and reassignment of the screens.
-
/ ------------------------------------------------------------------------------------------------------------------------------
// ------------------ Portable AI Voice Assistant Project by techiesms ------------------
// ---------------- Aug 28, 2024 ------------------
// ------------------ ------------------
// ------------------ This is the modified code and the ordignial code was ------------------
// ------------------ from KALOPROJECTS. A huge Shoutout to his amazing work ------------------
// KALO PROJECTS Github Repo - https://github.com/kaloprojects/KALO-ESP32-Voice-Assistant
// ------------------------------------------------------------------------------------------------------------------------------
// *** HINT: in case of an 'Sketch too Large' Compiler Warning/ERROR in Arduino IDE (ESP32 Dev Module):
// -> select a larger 'Partition Scheme' via menu > tools: e.g. using 'No OTA (2MB APP / 2MB SPIFFS) ***
/*
Library to be installed
ESP32 Audio I2S - https://github.com/schreibfaul1/ESP32-audioI2S
ArduinoJSON - https://arduinojson.org/?utm_source=meta&utm_medium=library.properties
SimpleTimer - https://github.com/kiryanenko/SimpleTimer
*/
#include <Wire.h>
#include <Adafruit_GFX.h>
#include <Adafruit_SSD1306.h>
#define SCREEN_WIDTH 128
#define SCREEN_HEIGHT 64
Adafruit_SSD1306 display1(SCREEN_WIDTH, SCREEN_HEIGHT, &Wire, -1);
Adafruit_SSD1306 display2(SCREEN_WIDTH, SCREEN_HEIGHT, &Wire, -1);
Adafruit_SSD1306 display3(SCREEN_WIDTH, SCREEN_HEIGHT, &Wire, -1);
Adafruit_SSD1306 display4(SCREEN_WIDTH, SCREEN_HEIGHT, &Wire, -1);
Adafruit_SSD1306 display5(SCREEN_WIDTH, SCREEN_HEIGHT, &Wire, -1);
Adafruit_SSD1306 display6(SCREEN_WIDTH, SCREEN_HEIGHT, &Wire, -1);
#define VERSION "\n=== KALO ESP32 Voice Assistant (last update: July 22, 2024) ======================"
#include <WiFi.h> // only included here
#include <SD.h> // also needed in other tabs (.ino)
#include <Audio.h> // needed for PLAYING Audio (via I2S Amplifier, e.g. MAX98357) with ..
// Audio.h library from Schreibfaul1: https://github.com/schreibfaul1/ESP32-audioI2S
// .. ensure you have actual version (July 18, 2024 or newer needed for 8bit wav files!)
#include <Arduino.h>
#include <WiFiClientSecure.h>
#include <ArduinoJson.h>
#include <SimpleTimer.h>
String text;
String filteredAnswer = "";
String repeat;
SimpleTimer Timer;
float batteryVoltage;
// --- PRIVATE credentials -----
const char* ssid = "SISI"; // ## INSERT your wlan ssid
const char* password = "Egypt100"; // ## INSERT your password
const char* OPENAI_KEY = "***************************************"; // ## optionally (needed for Open AI voices): INSERT your OpenAI key
const char* gemini_KEY = "AIzaSyDKT05JqPf5fXkpCgkFTNokIDRiZbWnscI"; //gemini api
#define TTS_MODEL 0 // 1 = OpenAI TTS; 0 = Google TTS
String OpenAI_Model = "gpt-3.5-turbo-instruct"; // Model
String OpenAI_Temperature = "0.20"; // temperature
String OpenAI_Max_Tokens = "100"; //Max Tokens
#define AUDIO_FILE "/Audio.wav" // mandatory, filename for the AUDIO recording
#define TTS_GOOGLE_LANGUAGE "en-US" // needed for Google TTS voices only (not needed for multilingual OpenAI voices :) \
// examples: en-US, en-IN, en-BG, en-AU, nl-NL, nl-BE, de-DE, th-TH etc. \
// more infos: https://cloud.google.com/text-to-speech/docs/voices
// --- PIN assignments ---------
#define pin_RECORD_BTN 36
#define pin_VOL_POTI 34
#define pin_repeat 13
#define pin_LED_RED 15
#define pin_LED_GREEN 2
#define pin_LED_BLUE 4
#define pin_I2S_DOUT 25 // 3 pins for I2S Audio Output (Schreibfaul1 audio.h Library)
#define pin_I2S_LRC 26
#define pin_I2S_BCLK 27
// --- global Objects ----------
Audio audio_play;
// declaration of functions in other modules (not mandatory but ensures compiler checks correctly)
// splitting Sketch into multiple tabs see e.g. here: https://www.youtube.com/watch?v=HtYlQXt14zU
bool I2S_Record_Init();
bool Record_Start(String filename);
bool Record_Available(String filename, float* audiolength_sec);
String SpeechToText_Deepgram(String filename);
void Deepgram_KeepAlive();
//for battry
const int batteryPin = 34; // Pin 34 for battery voltage reading
const float R1 = 100000.0; // 100k ohm resistor
const float R2 = 10000.0; // 10k ohm resistor
const float adcMax = 4095.0; // Max value for ADC on ESP32
const float vRef = 3.4; // Reference voltage for ESP32
const int numSamples = 100; // Number of samples for averaging
const float calibrationFactor = 1.48; // Calibration factor for ADC reading
// ------------------------------------------------------------------------------------------------------------------------------
// Select I2C BUS for OLEDs
void TCA9548A(uint8_t bus){
Wire.beginTransmission(0x70); // TCA9548A address
Wire.write(1 << bus); // send byte to select bus
Wire.endTransmission();
Serial.print(bus);
}
void setup() {
// Initialize serial communication
Serial.begin(115200);
////////////////
// Start I2C communication with the Multiplexer
Wire.begin();
// Init OLED display on bus number 2 (display 1)
TCA9548A(1);
if(!display1.begin(SSD1306_SWITCHCAPVCC, 0x3C)) {
Serial.println(F("SSD1306 allocation failed"));
for(;;);
}
// Clear the buffer
display1.clearDisplay();
// Init OLED display on bus number 3
TCA9548A(2);
if(!display2.begin(SSD1306_SWITCHCAPVCC, 0x3C)) {
Serial.println(F("SSD1306 allocation failed"));
for(;;);
}
// Clear the buffer
display2.clearDisplay();
// Init OLED display on bus number 4
TCA9548A(3);
if(!display3.begin(SSD1306_SWITCHCAPVCC, 0x3C)) {
Serial.println(F("SSD1306 allocation failed"));
for(;;);
}
// Clear the buffer
display3.clearDisplay();
// Init OLED display on bus number 5
TCA9548A(4);
if(!display4.begin(SSD1306_SWITCHCAPVCC, 0x3C)) {
Serial.println(F("SSD1306 allocation failed"));
for(;;);
}
// Clear the buffer
display4.clearDisplay();
TCA9548A(6);
if(!display5.begin(SSD1306_SWITCHCAPVCC, 0x3C)) {
Serial.println(F("SSD1306 allocation failed"));
for(;;);
}
// Clear the buffer
display5.clearDisplay();
TCA9548A(7);
if(!display6.begin(SSD1306_SWITCHCAPVCC, 0x3C)) {
Serial.println(F("SSD1306 allocation failed"));
for(;;);
}
// Clear the buffer
display6.clearDisplay();
TCA9548A(7);
display6.setTextSize(9);
display6.setTextColor(WHITE);
display6.setCursor(0, 0);
// Display static text
display6.println("E");
display6.display();
TCA9548A(6);
display5.setTextSize(9);
display5.setTextColor(WHITE);
display5.setCursor(0, 0);
// Display static text
display5.println("G");
display5.display();
TCA9548A(4);
display4.setTextSize(9);
display4.setTextColor(WHITE);
display4.setCursor(0, 0);
// Display static text
display4.println("Y");
display4.display();
TCA9548A(3);
display3.setTextSize(9);
display3.setTextColor(WHITE);
display3.setCursor(0, 0);
// Display static text
display3.println("P");
display3.display();
TCA9548A(2);
display2.setTextSize(9);
display2.setTextColor(WHITE);
display2.setCursor(0, 0);
// Display static text
display2.println("T");
display2.display();
// voice things here
/////
TCA9548A(1);
display1.setTextSize(9);
display1.setTextColor(WHITE);
display1.setCursor(0, 0);
// Display static text
display1.println("+");
display1.display();
///////////////////////////////////////
Serial.setTimeout(100); // 10 times faster reaction after CR entered (default is 1000ms)
pinMode(batteryPin, INPUT);
analogReadResolution(12); // 12-bit ADC resolution
// Pin assignments:
pinMode(pin_LED_RED, OUTPUT);
pinMode(pin_LED_GREEN, OUTPUT);
pinMode(pin_LED_BLUE, OUTPUT);
pinMode(pin_RECORD_BTN, INPUT); // use INPUT_PULLUP if no external Pull-Up connected ##
pinMode(pin_repeat, INPUT);
pinMode(12, OUTPUT);
digitalWrite(12, LOW);
// on INIT: walk 1 sec thru 3 RGB colors (RED -> GREEN -> BLUE), then stay on GREEN
led_RGB(50, 0, 0);
delay(500);
led_RGB(0, 50, 0);
delay(500);
led_RGB(0, 0, 50);
delay(500);
led_RGB(0, 0, 0);
// Hello World
Serial.println(VERSION);
Timer.setInterval(10000);
// Connecting to WLAN
WiFi.mode(WIFI_STA);
WiFi.begin(ssid, password);
Serial.print("Connecting WLAN ");
while (WiFi.status() != WL_CONNECTED) {
Serial.print(".");
delay(500);
}
Serial.println(". Done, device connected.");
led_RGB(0, 50, 0); // GREEN
// Initialize SD card
if (!SD.begin()) {
Serial.println("ERROR - SD Card initialization failed!");
return;
}
// initialize KALO I2S Recording Services (don't forget!)
I2S_Record_Init();
// INIT Audio Output (via Audio.h, see here: https://github.com/schreibfaul1/ESP32-audioI2S)
audio_play.setPinout(pin_I2S_BCLK, pin_I2S_LRC, pin_I2S_DOUT);
audio_play.setVolume(100); //21
// INIT done, starting user interaction
Serial.println("> HOLD button for recording AUDIO .. RELEASE button for REPLAY & Deepgram transcription");
}
// ------------------------------------------------------------------------------------------------------------------------------
void loop() {
display1.clearDisplay();
display2.clearDisplay();
display3.clearDisplay();
display4.clearDisplay();
display5.clearDisplay();
display6.clearDisplay();
// Write to OLED on bus number 1
TCA9548A(7);
display6.setTextSize(1);
display6.setTextColor(WHITE);
display6.setCursor(0, 0);
// Display static text
display6.println("114,535,772");
display6.setCursor(0, 10);
// Display static text
display6.println("(2023)");
display6.display();
TCA9548A(6);
display5.setTextSize(1);
display5.setTextColor(WHITE);
display5.setCursor(0, 0);
// Display static text
display5.println("1 USD = 50.80 EGP");
display5.setCursor(0, 10);
// Display static text
display5.println("1 GBP = 64.15 EGP");
display5.setCursor(0, 20);
// Display static text
display5.println("1 EUR = 53.38 EGP");
display5.display();
TCA9548A(3);
display3.setTextSize(1);
display3.setTextColor(WHITE);
display3.setCursor(0, 0);
// Display static text
display3.println("PRODUCT");
display3.setCursor(0, 10);
// Display static text
display3.println("$53.9B | $95.7B");
display3.display();
TCA9548A(4);
display4.setTextSize(1);
display4.setTextColor(WHITE);
display4.setCursor(0, 0);
// Display static text
display4.println("33.3%");
display4.setCursor(0, 10);
// Display static text
display4.println("(2024)");
display4.display();
TCA9548A(2);
display2.setTextSize(1);
display2.setTextColor(WHITE);
display2.setCursor(0, 0);
// Display static text
display2.println("7.2%");
display2.setCursor(0, 10);
// Display static text
display2.println("(2024)");
display2.display();
delay(5000);
display1.clearDisplay();
display2.clearDisplay();
display3.clearDisplay();
display4.clearDisplay();
display5.clearDisplay();
display6.clearDisplay();
TCA9548A(7);
display6.setTextSize(1);
display6.setTextColor(WHITE);
display6.setCursor(0, 0);
// Display static text
display6.println("Growth Rate:");
display6.setCursor(0, 10);
// Display static text
display6.println("1.7%");
display6.display();
TCA9548A(6);
display5.setTextSize(1);
display5.setTextColor(WHITE);
display5.setCursor(0, 0);
// Display static text
display5.println("1 Month");
display5.setCursor(0, 10);
// Display static text
display5.println("-2.5%");
display5.display();
TCA9548A(3);
display3.setTextSize(1);
display3.setTextColor(WHITE);
display3.setCursor(0, 0);
// Display static text
display3.println("PER CAPITA");
display3.setCursor(0, 10);
// Display static text
display3.println("$486 | $862");
display3.display();
TCA9548A(4);
display4.setTextSize(1);
display4.setTextColor(WHITE);
display4.setCursor(0, 0);
// Display static text
display4.println("Year Increase");
display4.setCursor(0, 10);
// Display static text
display4.println("+30.9%");
display4.display();
TCA9548A(2);
display2.setTextSize(1);
display2.setTextColor(WHITE);
display2.setCursor(0, 0);
// Display static text
display2.println("Labor Force Participation");
display2.setCursor(0, 10);
// Display static text
display2.println("43.4%");
display2.display();
delay(5000);
// display1.clearDisplay();
display2.clearDisplay();
display3.clearDisplay();
display4.clearDisplay();
display5.clearDisplay();
display6.clearDisplay();
TCA9548A(7);
display6.setTextSize(1);
display6.setTextColor(WHITE);
display6.setCursor(0, 0);
// Display static text
display6.println("2050:");
display6.setCursor(0, 10);
// Display static text
display6.println("161,630,192");
display6.setCursor(0, 20);
// Display static text
display6.println("(+41%)");
display6.display();
TCA9548A(6);
display5.setTextSize(1);
display5.setTextColor(WHITE);
display5.setCursor(0, 0);
// Display static text
display5.println("6 Month");
display5.setCursor(0, 10);
// Display static text
display5.println("-5.9%");
display5.display();
TCA9548A(3);
display3.setTextSize(1);
display3.setTextColor(WHITE);
display3.setCursor(0, 0);
// Display static text
display3.println("Main Exports:");
display3.setCursor(0, 10);
// Display static text
display3.println("Petrol Gas ($9.53B)");
display3.setCursor(0, 20);
// Display static text
display3.println("N-Fertilizer ($3.37B)");
display3.setCursor(0, 30);
// Display static text
display3.println("Refined Oil ($2.88B)");
display3.display();
TCA9548A(4);
display4.setTextSize(1);
display4.setTextColor(WHITE);
display4.setCursor(0, 0);
// Display static text
display4.println("Consumer Price Index");
display4.setCursor(0, 10);
// Display static text
display4.println("235.10");
display4.display();
TCA9548A(2);
display2.setTextSize(1);
display2.setTextColor(WHITE);
display2.setCursor(0, 0);
// Display static text
display2.println("Avg Yr Salary:");
display2.setCursor(0, 10);
// Display static text
display2.println("156,526 EGP");
display2.setCursor(0, 20);
// Display static text
display2.println("(5065.40 USD)");
display2.display();
delay(5000);
display1.clearDisplay();
display2.clearDisplay();
display3.clearDisplay();
display4.clearDisplay();
display5.clearDisplay();
display6.clearDisplay();
TCA9548A(7);
display6.setTextSize(1);
display6.setTextColor(WHITE);
display6.setCursor(0, 0);
// Display static text
display6.println("Age Distribution");
display6.setCursor(0, 10);
// Display static text
display6.println("0-14 = 15.7%");
display6.setCursor(0, 20);
// Display static text
display6.println("15-64 = 78.1%");
display6.setCursor(0, 30);
// Display static text
display6.println("65+ = 6.2%");
display6.display();
TCA9548A(6);
display5.setTextSize(1);
display5.setTextColor(WHITE);
display5.setCursor(0, 0);
// Display static text
display5.println("1Y");
display5.setCursor(0, 10);
// Display static text
display5.println("-48.46%");
display5.display();
TCA9548A(3);
display3.setTextSize(1);
display3.setTextColor(WHITE);
display3.setCursor(0, 0);
// Display static text
display3.println("Export Destination:");
display3.setCursor(0, 10);
// Display static text
display3.println("Turkey ($4.23B)");
display3.setCursor(0, 20);
// Display static text
display3.println("Italy ($3.32B)");
display3.setCursor(0, 30);
// Display static text
display3.println("USA ($3.21B)");
display3.display();
TCA9548A(4);
display4.setTextSize(1);
display4.setTextColor(WHITE);
display4.setCursor(0, 0);
// Display static text
display4.println("Producer Price Index");
display4.setCursor(0, 10);
// Display static text
display4.println("501.90");
display4.display();
TCA9548A(2);
display2.setTextSize(1);
display2.setTextColor(WHITE);
display2.setCursor(0, 0);
// Display static text
display2.println("Main occupation:");
display2.setCursor(0, 10);
// Display static text
display2.println("Services (52.98%)");
display2.setCursor(0, 20);
// Display static text
display2.println("Industry (28.66%)");
display2.setCursor(0, 30);
// Display static text
display2.println("Agriculture (18.66%)");
display2.display();
delay(5000);
display1.clearDisplay();
display2.clearDisplay();
display3.clearDisplay();
display4.clearDisplay();
display5.clearDisplay();
display6.clearDisplay();
TCA9548A(7);
display6.setTextSize(1);
display6.setTextColor(WHITE);
display6.setCursor(0, 0);
// Display static text
display6.println("Female | Male");
display6.setCursor(0, 10);
// Display static text
display6.println("49.43% | 50.57%");
display6.display();
TCA9548A(6);
display5.setTextSize(1);
display5.setTextColor(WHITE);
display5.setCursor(0, 0);
// Display static text
display5.println("5Y");
display5.setCursor(0, 10);
// Display static text
display5.println("-103.8%");
display5.display();
TCA9548A(3);
display3.setTextSize(1);
display3.setTextColor(WHITE);
display3.setCursor(0, 0);
// Display static text
display3.println("Main Imports:");
display3.setCursor(0, 10);
// Display static text
display3.println("Refined Oil ($6.33B)");
display3.setCursor(0, 20);
// Display static text
display3.println("Wheat ($4.82B)");
display3.setCursor(0, 30);
// Display static text
display3.println("Crude Oil ($3.87B)");
display3.display();
TCA9548A(4);
display4.setTextSize(1);
display4.setTextColor(WHITE);
display4.setCursor(0, 0);
// Display static text
display4.println("Money Supply Growth");
display4.setCursor(0, 10);
// Display static text
display4.println("+29.6%");
display4.display();
TCA9548A(2);
display2.setTextSize(1);
display2.setTextColor(WHITE);
display2.setCursor(0, 0);
// Display static text
display2.println("Youth Unemployment EDU");
display2.setCursor(0, 10);
// Display static text
display2.println("Primary: 12%");
display2.setCursor(0, 20);
// Display static text
display2.println("Prep: 13%");
display2.setCursor(0, 30);
// Display static text
display2.println("Secondary: 34%");
display2.display();
delay(5000);
display1.clearDisplay();
display2.clearDisplay();
display3.clearDisplay();
display4.clearDisplay();
display5.clearDisplay();
display6.clearDisplay();
TCA9548A(7);
display6.setTextSize(1);
display6.setTextColor(WHITE);
display6.setCursor(0, 0);
// Display static text
display6.println("Fertility rate");
display6.setCursor(0, 10);
// Display static text
display6.println("2.88");
display6.display();
TCA9548A(6);
display5.setTextSize(1);
display5.setTextColor(WHITE);
display5.setCursor(0, 0);
// Display static text
display5.println("MAX");
display5.setCursor(0, 10);
// Display static text
display5.println("-159.4%");
display5.display();
TCA9548A(3);
display3.setTextSize(1);
display3.setTextColor(WHITE);
display3.setCursor(0, 0);
// Display static text
display3.println("Import Partners:");
display3.setCursor(0, 10);
// Display static text
display3.println("China ($16.7B)");
display3.setCursor(0, 20);
// Display static text
display3.println("USA ($6.61B)");
display3.setCursor(0, 30);
// Display static text
display3.println("KSA ($6.44B)");
display3.display();
TCA9548A(4);
display4.setTextSize(1);
display4.setTextColor(WHITE);
display4.setCursor(0, 0);
// Display static text
display4.println("Unit Labor Cost");
display4.setCursor(0, 10);
// Display static text
display4.println("Median | Average");
display4.setCursor(0, 20);
// Display static text
display4.println("0.58 | 1.27");
display4.setCursor(0, 20);
// Display static text
display4.println("(2018)");
display4.display();
TCA9548A(2);
display2.setTextSize(1);
display2.setTextColor(WHITE);
display2.setCursor(0, 0);
// Display static text
display2.println("Avg Duration:");
display2.setCursor(0, 10);
// Display static text
display2.println("49 Months");
display2.display();
delay(5000);
here:
if (digitalRead(pin_RECORD_BTN) == LOW) // Recording started (ongoing)
{
led_RGB(50, 0, 0); // RED means 'Recording ongoing'
delay(30); // unbouncing & suppressing button 'click' noise in begin of audio recording
// Before we start any recording we stop any earlier Audio Output or streaming (e.g. radio)
if (audio_play.isRunning()) {
audio_play.connecttohost(""); // 'audio_play.stopSong()' wouldn't be enough (STT wouldn't reconnect)
}
//Start Recording
Record_Start(AUDIO_FILE);
}
if (digitalRead(pin_RECORD_BTN) == HIGH) // Recording not started yet .. OR stopped now (on release button)
{
led_RGB(0, 0, 0);
float recorded_seconds;
if (Record_Available(AUDIO_FILE, &recorded_seconds)) // true once when recording finalized (.wav file available)
{
if (recorded_seconds > 0.4) // ignore short btn TOUCH (e.g. <0.4 secs, used for 'audio_play.stopSong' only)
{
// ## Demo 1 - PLAY your own recorded AUDIO file (from SD card)
// Hint to 8bit: you need AUDIO.H library from July 18,2024 or later (otherwise 8bit produce only loud (!) noise)
// we commented out Demo 1 to jump to Demo 2 directly .. uncomment once if you want to listen to your record !
/*audio_play.connecttoFS(SD, AUDIO_FILE ); // play your own recorded audio
while (audio_play.isRunning()) {audio_play.loop();} // wait here until done (just for Demo purposes) */
// ## Demo 2 [SpeechToText] - Transcript the Audio (waiting here until done)
// led_RGB(HIGH, HIGH, LOW); // BLUE means: 'Deepgram server creates transcription'
String transcription = SpeechToText_Deepgram(AUDIO_FILE);
//led_RGB(HIGH, LOW, HIGH); // GREEN means: 'Ready for recording'
String again = "Please Ask Again . . . . . . . . . . . ";
Serial.println(transcription);
if (transcription == "") {
led_RGB(0, 0, 255);
if (TTS_MODEL == 1)
audio_play.openai_speech(OPENAI_KEY, "tts-1", again, "shimmer", "mp3", "1"); //ONYX,shimmer,alloy (Uncomment this to use OpenAI TTS)
else
speakTextInChunks(again, 93); // ( Uncomment this to use Google TTS )
Serial.println("Please Ask Again");
while (audio_play.isRunning()) // wait here until finished (just for Demo purposes, before we play Demo 4)
{
audio_play.loop();
}
goto here;
}
//----------------------------------------------------
WiFiClientSecure client;
client.setInsecure(); // Disable SSL verification for simplicity (not recommended for production)
String Answer = ""; // Declare Answer variable here
text = "";
if (client.connect("generativelanguage.googleapis.com", 443)) {
String url = "/v1beta/models/gemini-1.5-flash:generateContent?key=" + String(gemini_KEY);
String payload = String("{\"contents\": [{\"parts\":[{\"text\":\"" + transcription + "\"}]}],\"generationConfig\": {\"maxOutputTokens\": " + OpenAI_Max_Tokens + "}}");
// Send the HTTP POST request
client.println("POST " + url + " HTTP/1.1");
client.println("Host: generativelanguage.googleapis.com");
client.println("Content-Type: application/json");
client.print("Content-Length: ");
client.println(payload.length());
client.println();
client.println(payload);
// Read the response
String response;
while (client.connected()) {
String line = client.readStringUntil('\n');
if (line == "\r") {
break;
}
}
// Read the actual response
response = client.readString();
parseResponse(response);
} else {
Serial.println("Connection failed!");
}
client.stop(); // End the connection
//----------------------------------------------------
if (filteredAnswer != "") // we found spoken text .. now starting Demo examples:
{
led_RGB(0, 0, 255);
Serial.print("OpenAI speaking: ");
Serial.println(filteredAnswer);
if (TTS_MODEL == 1)
audio_play.openai_speech(OPENAI_KEY, "tts-1", filteredAnswer.c_str(), "shimmer", "mp3", "1"); //ONYX,shimmer,alloy (Uncomment this to use OpenAI TTS)
else
speakTextInChunks(filteredAnswer, 93); // ( Uncomment this to use Google TTS )
}
}
}
}
//for repeat-------------------------
if (digitalRead(pin_repeat) == LOW) {
delay(500);
analogWrite(pin_LED_BLUE, 255);
Serial.print("repeat - ");
Serial.println(repeat);
if (TTS_MODEL == 1)
audio_play.openai_speech(OPENAI_KEY, "tts-1", repeat, "shimmer", "mp3", "1"); //ONYX,shimmer,alloy (Uncomment this to use OpenAI TTS)
else
speakTextInChunks(repeat, 93); // ( Uncomment this to use Google TTS )
}
audio_play.loop();
if (audio_play.isRunning()) {
analogWrite(pin_LED_BLUE, 255);
if (digitalRead(pin_RECORD_BTN) == LOW) {
goto here;
}
} else {
analogWrite(pin_LED_BLUE, 0);
}
String batt = "Good afternoon Professor Neil Gershenfeld of How To Make Almost Anything and The Center of Bits and Atoms, looking handsome as usual. I'm the Motherboard to the Mother of the World, Egypt. I was made by Kareem El-Sisi for his final project at MIT. I'm an AI-Powered Economic and Social Development Advisor that has been trained to serve the President of Egypt. Let me give you a tour, if you look at my front side you will find my dashboard has a range of development indicators to provide you with an overview of the progress and health of of our nation. On the other side you will find the map of our country, Egypt, with the Nile River illuminated. My frame was a remixed version of the grand gate of the Karnak Temple, with the intricate designs of the patterns made by Kareem to represent 6,000 years of Egyptian excellence and its cultural: the palm leaves represent Egypt's desert and nature, the lotus flowers and papyrus represent Ancient Egypt's Kingdoms, the seashells represent Egypt's Coptic Christian Heritage, the triangle architecture represent Egypt's Nubian and Amazighi culture showcasing our nation's diversity, and the geometric arabesque patterns represent the Islamic Empires of Egypt. This project was inspired by Kareem's background in economics and data science, his love for Egypt, and his interest in AI.";
if (Timer.isReady()) {
battry_filtering();
Serial.print("Battery Voltage: ");
Serial.println(batteryVoltage);
if (batteryVoltage < 3.4) {
if (TTS_MODEL == 1)
audio_play.openai_speech(OPENAI_KEY, "tts-1", batt.c_str(), "shimmer", "mp3", "1");
else
speakTextInChunks(batt.c_str(), 93); // ( Uncomment this to use Google TTS )
}
Timer.reset();
}
// Schreibfaul1 loop für Play Audio
// [Optional]: Stabilize WiFiClientSecure.h + Improve Speed of STT Deepgram response (~1 sec faster)
// Idea: Connect once, then sending each 5 seconds dummy bytes (to overcome Deepgram auto-closing 10 secs after last request)
// keep in mind: WiFiClientSecure.h still not 100% reliable (assuming RAM heap issue, rarely freezes after e.g. 10 mins)
if (digitalRead(pin_RECORD_BTN) == HIGH && !audio_play.isRunning()) // but don't do it during recording or playing
{
static uint32_t millis_ping_before;
if (millis() > (millis_ping_before + 5000)) {
millis_ping_before = millis();
led_RGB(0, 0, 0); // short LED OFF means: 'Reconnection server, can't record in moment'
Deepgram_KeepAlive();
}
}
}
void speakTextInChunks(String text, int maxLength) {
int start = 0;
while (start < text.length()) {
int end = start + maxLength;
// Ensure we don't split in the middle of a word
if (end < text.length()) {
while (end > start && text[end] != ' ' && text[end] != '.' && text[end] != ',') {
end--;
}
}
// If no space or punctuation is found, just split at maxLength
if (end == start) {
end = start + maxLength;
}
String chunk = text.substring(start, end);
audio_play.connecttospeech(chunk.c_str(), TTS_GOOGLE_LANGUAGE);
while (audio_play.isRunning()) {
audio_play.loop();
if (digitalRead(pin_RECORD_BTN) == LOW) {
break;
}
}
start = end + 1; // Move to the next part, skipping the space
// delay(200); // Small delay between chunks
}
}
// ------------------------------------------------------------------------------------------------------------------------------
// Revised section to handle response parsing
void parseResponse(String response) {
repeat = "";
// Extract JSON part from the response
int jsonStartIndex = response.indexOf("{");
int jsonEndIndex = response.lastIndexOf("}");
if (jsonStartIndex != -1 && jsonEndIndex != -1) {
String jsonPart = response.substring(jsonStartIndex, jsonEndIndex + 1);
// Serial.println("Clean JSON:");
// Serial.println(jsonPart);
DynamicJsonDocument doc(1024); // Increase size if needed
DeserializationError error = deserializeJson(doc, jsonPart);
if (error) {
Serial.print("DeserializeJson failed: ");
Serial.println(error.c_str());
return;
}
if (doc.containsKey("candidates")) {
for (const auto& candidate : doc["candidates"].as<JsonArray>()) {
if (candidate.containsKey("content") && candidate["content"].containsKey("parts")) {
for (const auto& part : candidate["content"]["parts"].as<JsonArray>()) {
if (part.containsKey("text")) {
text += part["text"].as<String>();
}
}
text.trim();
// Serial.print("Extracted Text: ");
// Serial.println(text);
filteredAnswer = "";
for (size_t i = 0; i < text.length(); i++) {
char c = text[i];
if (isalnum(c) || isspace(c) || c == ',' || c == '.' || c == '\'') {
filteredAnswer += c;
} else {
filteredAnswer += ' ';
}
}
// filteredAnswer = text;
// Serial.print("FILTERED - ");
//Serial.println(filteredAnswer);
repeat = filteredAnswer;
}
}
} else {
Serial.println("No 'candidates' field found in JSON response.");
}
} else {
Serial.println("No valid JSON found in the response.");
}
}
void led_RGB(int red, int green, int blue) {
static bool red_before, green_before, blue_before;
// writing to real pin only if changed (increasing performance for frequently repeated calls)
if (red != red_before) {
analogWrite(pin_LED_RED, red);
red_before = red;
}
if (green != green_before) {
analogWrite(pin_LED_GREEN, green);
green_before = green;
}
if (blue != blue_before) {
analogWrite(pin_LED_BLUE, blue);
blue_before = blue;
}
}
void battry_filtering() {
float adcValueSum = 0;
// ADC Averaging
for (int i = 0; i < numSamples; i++) {
adcValueSum += analogRead(batteryPin);
delay(2);
}
float adcValueAvg = adcValueSum / numSamples;
batteryVoltage = adcValueAvg (vRef / adcMax) calibrationFactor;
batteryVoltage = batteryVoltage * ((R1 + R2) / R2);
// Publishing the calculated battery voltage to Adafruit IO
Serial.print("Battery Voltage: ");
Serial.println(batteryVoltage);
//photocell.publish(batteryVoltage);
}
— The Battle for Big Screens —
-
#include <lvgl.h>
#include <TFT_eSPI.h>
#include <image1.h> // Include header for image 1
#define SCREEN_WIDTH 320
#define SCREEN_HEIGHT 480
#define DRAW_BUF_SIZE (SCREEN_WIDTH SCREEN_HEIGHT / 10 (LV_COLOR_DEPTH / 8))
uint32_t draw_buf[DRAW_BUF_SIZE / 4];
// If logging is enabled, it will inform the user about what is happening in the library
void log_print(lv_log_level_t level, const char * buf) {
LV_UNUSED(level);
Serial.println(buf);
Serial.flush();
}
// Function to display an image
void display_image(const void * image_src) {
static lv_obj_t * img = NULL; // Keep track of the current image object
if (img == NULL) {
// Create the image object for the first time
img = lv_image_create(lv_screen_active());
lv_obj_align(img, LV_ALIGN_CENTER, 0, 0);
}
// Set the source of the image
lv_image_set_src(img, image_src);
}
void setup() {
String LVGL_Arduino = String("LVGL Library Version: ") + lv_version_major() + "." + lv_version_minor() + "." + lv_version_patch();
Serial.begin(115200);
Serial.println(LVGL_Arduino);
// Start LVGL
lv_init();
// Register print function for debugging
lv_log_register_print_cb(log_print);
// Create a display object
lv_display_t * disp;
// Initialize the TFT display using the TFT_eSPI library
disp = lv_tft_espi_create(SCREEN_WIDTH, SCREEN_HEIGHT, draw_buf, sizeof(draw_buf));
lv_display_set_rotation(disp, LV_DISPLAY_ROTATION_180);
}
void loop() {
// Display the first image
LV_IMAGE_DECLARE(image1);
display_image(&image1);
lv_task_handler();
delay(2000); // Wait for 1 second
}
-
Error: There’s a problem with the three screens, they’re not allowing me to display more than one photo per screen. Some of them turn off out of nowhere.
This calls for understanding how the relationship between the SD card and the board.
Fix: Quentin came up with the brilliant strategy of converting the jpegs to bits. Then we’d upload them to the screens individually via their own respective ESP32 microcontroller, remove the SD cards to avoid communication between them. -
This is an example for one screen:
// Sketch to display images on a 480 x 320 ILI9486 Raspberry Pi 3.5" TFT (Waveshare design)// which has a 16-bit serial interface based on 74HC04, 74HC4040 and 2 x 74HC4094 logic chips
// Renders images stored in an array in program (FLASH)JPEG images are stored in header files
// (see jpeg1.h etc.)
// The sketch does not need the SD or sdFat libraries since it does not access an SD Card.
// As well as the TFT_eSPI library:
// https://github.com/Bodmer/TFT_eSPI
// the sketch need the JPEG Decoder library. This can be loaded via the Library Manager.
// or can be downloaded here:
// https://github.com/Bodmer/JPEGDecoder
//----------------------------------------------------------------------------------------------------
#include <SPI.h>
#include <TFT_eSPI.h>
#define TFT_CS 15
#define SPI_MOSI 13
#define SPI_MISO 12
#define SPI_CLK 14
TFT_eSPI tft = TFT_eSPI();
// JPEG decoder library
#include <JPEGDecoder.h>
// Return the minimum of two values a and b
#define minimum(a,b) (((a) < (b)) ? (a) : (b))
// Include the sketch header file that contains the image stored as an array of bytes
// More than one image array could be stored in each header file.
#include "img_data_1_wgi.h"
#include "img_data_2_wgi.h"
#include "img_data_3_wgi.h"
#include "img_data_4_wgi.h"
#include "img_data_5_wgi.h"
#include "img_data_6_wgi.h"
#include "img_data_7_wgi.h"
#include "img_data_8_wgi.h"
// Count how many times the image is drawn for test purposes
uint32_t icount = 0;
//----------------------------------------------------------------------------------------------------
//####################################################################################################
// Setup
//####################################################################################################
void setup() {
Serial.begin(115200);
tft.begin();
}
//####################################################################################################
// Main loop
//####################################################################################################
void loop() {
// The image is 300 x 300 pixels so we do some sums to position image in the middle of the screen!
// Doing this by reading the image width and height from the jpeg info is left as an exercise!
tft.setRotation(2); // portrait
tft.fillScreen(random(0xFFFF));
drawArrayJpeg(img_data_1, sizeof(img_data_1), 0, 0); // Draw a jpeg image stored in memory at x,y
delay(5000);
tft.setRotation(2); // portrait
tft.fillScreen(random(0xFFFF));
drawArrayJpeg(img_data_2, sizeof(img_data_2), 0, 0); // Draw a jpeg image stored in memory
delay(5000);
tft.setRotation(2); // portrait
tft.fillScreen(random(0xFFFF));
drawArrayJpeg(img_data_3, sizeof(img_data_3), 0, 0); // Draw a jpeg image stored in memory
delay(5000);
tft.setRotation(2); // portrait
tft.fillScreen(random(0xFFFF));
drawArrayJpeg(img_data_4, sizeof(img_data_4), 0, 0); // Draw a jpeg image stored in memory
delay(5000);
tft.setRotation(2); // portrait
tft.fillScreen(random(0xFFFF));
drawArrayJpeg(img_data_5, sizeof(img_data_5), 0, 0); // Draw a jpeg image stored in memory
delay(5000);
tft.setRotation(2); // portrait
tft.fillScreen(random(0xFFFF));
drawArrayJpeg(img_data_6, sizeof(img_data_6), 0, 0); // Draw a jpeg image stored in memory
delay(5000);
tft.setRotation(2); // portrait
tft.fillScreen(random(0xFFFF));
drawArrayJpeg(img_data_7, sizeof(img_data_7), 0, 0); // Draw a jpeg image stored in memory
delay(5000);
tft.setRotation(2); // portrait
tft.fillScreen(random(0xFFFF));
drawArrayJpeg(img_data_8, sizeof(img_data_8), 0, 0); // Draw a jpeg image stored in memory
delay(5000);
}
//####################################################################################################
// Draw a JPEG on the TFT pulled from a program memory array
//####################################################################################################
void drawArrayJpeg(const uint8_t arrayname[], uint32_t array_size, int xpos, int ypos) {
int x = xpos;
int y = ypos;
JpegDec.decodeArray(arrayname, array_size);
jpegInfo(); // Print information from the JPEG file (could comment this line out)
renderJPEG(x, y);
Serial.println("#########################");
}
//####################################################################################################
// Draw a JPEG on the TFT, images will be cropped on the right/bottom sides if they do not fit
//####################################################################################################
// This function assumes xpos,ypos is a valid screen coordinate. For convenience images that do not
// fit totally on the screen are cropped to the nearest MCU size and may leave right/bottom borders.
void renderJPEG(int xpos, int ypos) {
// retrieve information about the image
uint16_t *pImg;
uint16_t mcu_w = JpegDec.MCUWidth;
uint16_t mcu_h = JpegDec.MCUHeight;
uint32_t max_x = JpegDec.width;
uint32_t max_y = JpegDec.height;
// Jpeg images are draw as a set of image block (tiles) called Minimum Coding Units (MCUs)
// Typically these MCUs are 16x16 pixel blocks
// Determine the width and height of the right and bottom edge image blocks
uint32_t min_w = minimum(mcu_w, max_x % mcu_w);
uint32_t min_h = minimum(mcu_h, max_y % mcu_h);
// save the current image block size
uint32_t win_w = mcu_w;
uint32_t win_h = mcu_h;
// record the current time so we can measure how long it takes to draw an image
uint32_t drawTime = millis();
// save the coordinate of the right and bottom edges to assist image cropping
// to the screen size
max_x += xpos;
max_y += ypos;
// read each MCU block until there are no more
while (JpegDec.read()) {
// save a pointer to the image block
pImg = JpegDec.pImage ;
// calculate where the image block should be drawn on the screen
int mcu_x = JpegDec.MCUx * mcu_w + xpos; // Calculate coordinates of top left corner of current MCU
int mcu_y = JpegDec.MCUy * mcu_h + ypos;
// check if the image block size needs to be changed for the right edge
if (mcu_x + mcu_w <= max_x) win_w = mcu_w;
else win_w = min_w;
// check if the image block size needs to be changed for the bottom edge
if (mcu_y + mcu_h <= max_y) win_h = mcu_h;
else win_h = min_h;
// copy pixels into a contiguous block
if (win_w != mcu_w)
{
uint16_t *cImg;
int p = 0;
cImg = pImg + win_w;
for (int h = 1; h < win_h; h++)
{
p += mcu_w;
for (int w = 0; w < win_w; w++)
{
cImg = (pImg + w + p);
cImg++;
}
}
}
// calculate how many pixels must be drawn
uint32_t mcu_pixels = win_w * win_h;
tft.startWrite();
// draw image MCU block only if it will fit on the screen
if (( mcu_x + win_w ) <= tft.width() && ( mcu_y + win_h ) <= tft.height())
{
// Now set a MCU bounding window on the TFT to push pixels into (x, y, x + width - 1, y + height - 1)
tft.setAddrWindow(mcu_x, mcu_y, win_w, win_h);
// Write all MCU pixels to the TFT window
while (mcu_pixels--) {
// Push each pixel to the TFT MCU area
tft.pushColor(*pImg++);
}
}
else if ( (mcu_y + win_h) >= tft.height()) JpegDec.abort(); // Image has run off bottom of screen so abort decoding
tft.endWrite();
}
// calculate how long it took to draw the image
drawTime = millis() - drawTime;
// print the results to the serial port
Serial.print(F( "Total render time was : ")); Serial.print(drawTime); Serial.println(F(" ms"));
Serial.println(F(""));
}
//####################################################################################################
// Print image information to the serial port (optional)
//####################################################################################################
void jpegInfo() {
Serial.println(F("==============="));
Serial.println(F("JPEG image info"));
Serial.println(F("==============="));
Serial.print(F( "Width :")); Serial.println(JpegDec.width);
Serial.print(F( "Height :")); Serial.println(JpegDec.height);
Serial.print(F( "Components :")); Serial.println(JpegDec.comps);
Serial.print(F( "MCU / row :")); Serial.println(JpegDec.MCUSPerRow);
Serial.print(F( "MCU / col :")); Serial.println(JpegDec.MCUSPerCol);
Serial.print(F( "Scan type :")); Serial.println(JpegDec.scanType);
Serial.print(F( "MCU width :")); Serial.println(JpegDec.MCUWidth);
Serial.print(F( "MCU height :")); Serial.println(JpegDec.MCUHeight);
Serial.println(F("==============="));
}
//####################################################################################################
// Show the execution time (optional)
//####################################################################################################
// WARNING: for UNO/AVR legacy reasons printing text to the screen with the Mega might not work for
// sketch sizes greater than ~70KBytes because 16-bit address pointers are used in some libraries.
// The Due will work fine with the HX8357_Due library.
void showTime(uint32_t msTime) {
//tft.setCursor(0, 0);
//tft.setTextFont(1);
//tft.setTextSize(2);
//tft.setTextColor(TFT_WHITE, TFT_BLACK);
//tft.print(F(" JPEG drawn in "));
//tft.print(msTime);
//tft.println(F(" ms "));
Serial.print(F(" JPEG drawn in "));
Serial.print(msTime);
Serial.println(F(" ms "));
}
The Assembly
— Integrating Everything —
The Design
The Vision
Now I would’ve loved to put several assembly videos of how each piece came together. Unfortunately, that assembly was never caught on tape, considering Anthony, the technical instructor, and I were all rushing to meet the absolute final deadline.
That being said, I remember exactly what happened and do still have the video of laser cutting the acrylic plexiglass with Alec.
As well as, a portion of the assembly when I was still testing the board where you can see how the PCB was placed inside the 3D printed frame and holding the acrylic board in the slot behind it.


The Final Product
The Motherboard
Results
Standing tall with a large PCB in its heart is the Motherboard, framed with intricate designs that celebrate 6000 years of Egypt’s diverse history and culture. Upon turning on the device, the three large screens united to present the map of Egypt while the five small screens at the bottom spelled out EGYPT with one screen per letter. As soon as the device connected to my Wi-Fi hotspot and logged in, it began showing the data on the smart screens as it continued, showing the indicators on the large screens.
The voice assistant that could’ve been the main event didn’t necessarily work due to a last-minute, however, it could definitely hear us through the microphone.
The project received a claim, both during the class review and the open house. Overall, I can rest and feel it was a success.


Failures
Right before Professor Neil came to our table. I tested the speakers one last time and realized that they were no longer working. It was too late or tough to change anything by then I decided to pull out the video of me testing the voice assistant to prove that it did work at some point. I’m grateful for my colleagues in the Arch section(Jana and Blake) who stood by me and confirmed to Professor Neil that it did work all night. Other than that, everything went well.
Receipts & Reflections
— Financials —
This Project was Expensive.
The Receipts
Now that I’ve discussed the build and showcased all the components that went into the board that had to be ordered, I will briefly share the financials of this project. Especially since everything moving forward will be “free” (whether its because I’m using machinery at MIT (milling and 3D printing) or because I’m doing it myself (assembly and programming). Here is the ledger, keep in mind this does not include the acrylic or the PLA filament which I found in the lab.

— Reflections —
Murphy's Law
The project faced several unexpected challenges, such as debugging hardware that would suddenly fail during testing or dealing with unforeseen software compatibility issues. These moments highlighted how even well-planned processes can unravel, emphasizing the need for contingency strategies.
Demand- vs Supply Time Management
Balancing demand for more advanced features with the team's available bandwidth meant careful scoping and prioritization. Deadlines dictated delivery choices, such as focusing on essential commands while postponing less critical functionalities like custom wake words.
80/20, 95/5
A significant portion of the project's functionality was achieved relatively quickly (80%), but perfecting the remaining edge cases consumed disproportionate time and effort (95/5). Debugging the code and figuring out the chaos of 3D printing and putting everything together seized the schedule.
Spiral Development, DevOps
The project adopted a spiral development approach, iterating on core functionalities and testing prototypes in small increments. This iterative process, paired with DevOps practices like automated testing, allowed early identification and resolution of integration bugs.
Triage
Prioritization was critical as not all issues could be addressed simultaneously; critical functionality like voice recognition took precedence over secondary features like aesthetic LED patterns. This triage approach ensured progress on high-impact components without derailing the timeline.
Serial vs Parallel Tasks
Some tasks, like writing audio processing code, had to be completed before subsequent testing could begin, reflecting serial dependencies. However, other components, such as hardware assembly and software development, were tackled in parallel to expedite overall progress.
Documentation During Development
While I did maintain clear documentation during the project, I missed some critical parts. The part which I did not miss, but definitely could not focus on was the final moments with Anthony rushing to assemble the project and hurry over to the Media lab.
System Integration & Finish Quality
System integration posed challenges, and it was a hair away from having a high finish quality. This could have been the reason why it didn’t introduce itself to Professor Neil.